Displaying Anthropometric Points and Head Rotation Angles
In this tutorial, you'll learn how to display anthropometric points and head rotation angles after a person's face has been found on a video or image. This tutorial is based on the tutorial Face Detection and Tracking in a Video Stream] and the corresponding project.
Displaying Anthropometric Points
- Create the project, in which faces will be detected and tracked using the
VideoWorkerobject. Faces in this project are highlighted with a green rectangle (see Face Detection and Tracking in a Video Stream]). - Modify the function
DrawFunction::Draw. Thepbio::RawSampleobject contains all the information about a tracked face, namely: face bounding rectangle, anthropometric points, position of eyes, angles, etc. Using thepbio::RawSample::getLandmarksmethod, get anthropometric points of a tracked face.
drawfunction.cpp
//static
QImage DrawFunction::Draw(
    const Worker::DrawingData &data)
    {
        ...
        // draw facial points
        {
            // get points
            const std::vector<pbio::RawSample::Point> points = sample.getLandmarks();
        }
        ...
    }
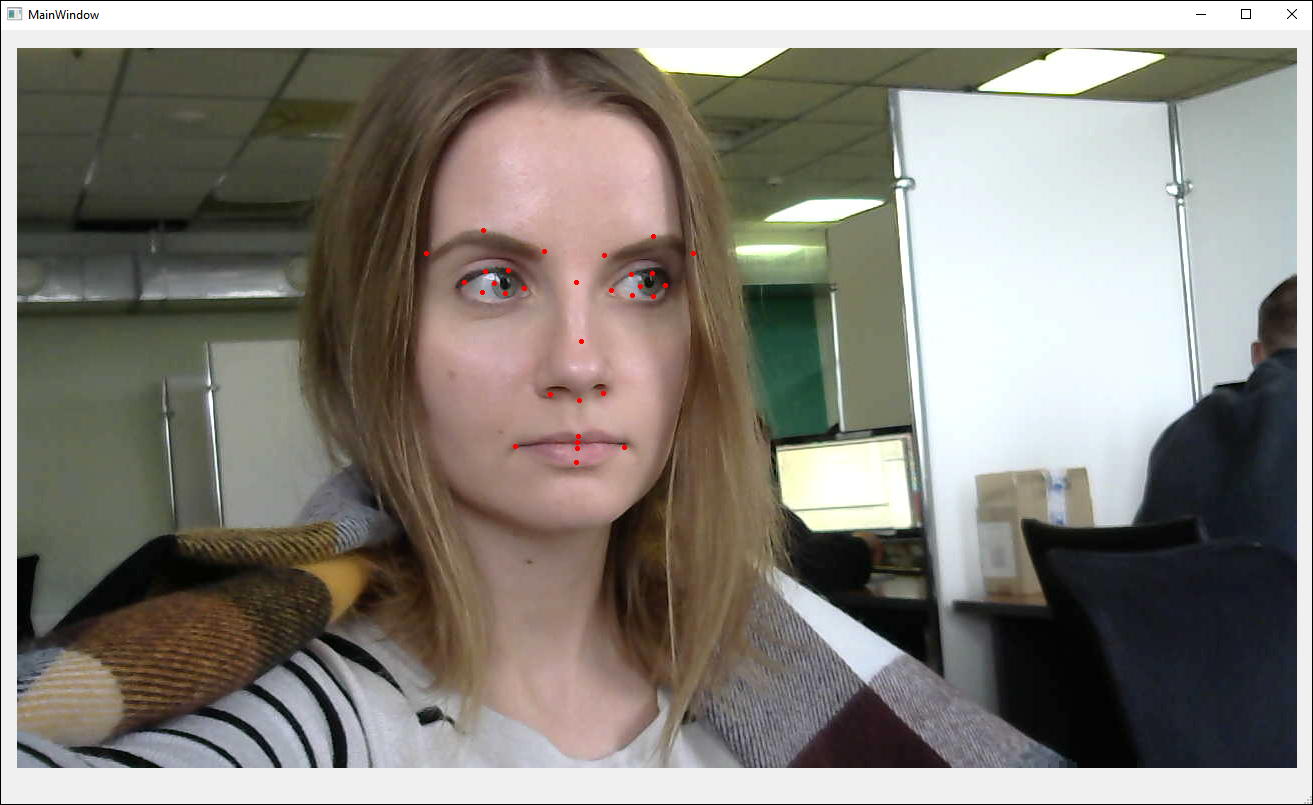
Note: In this project, we use the singlelbf set of anthropometric points (31 points). As an option, you can use a different set of points, which is called esr (47 points) (see Anthropometric Points]). To do this, you'll need to specify the configuration file video_worker.xml instead of video_worker_lbf.xml in the constructor ViewWindow::ViewWindow (ViewWindow.cpp) (see Face Detection and Tracking in a Video Stream]).
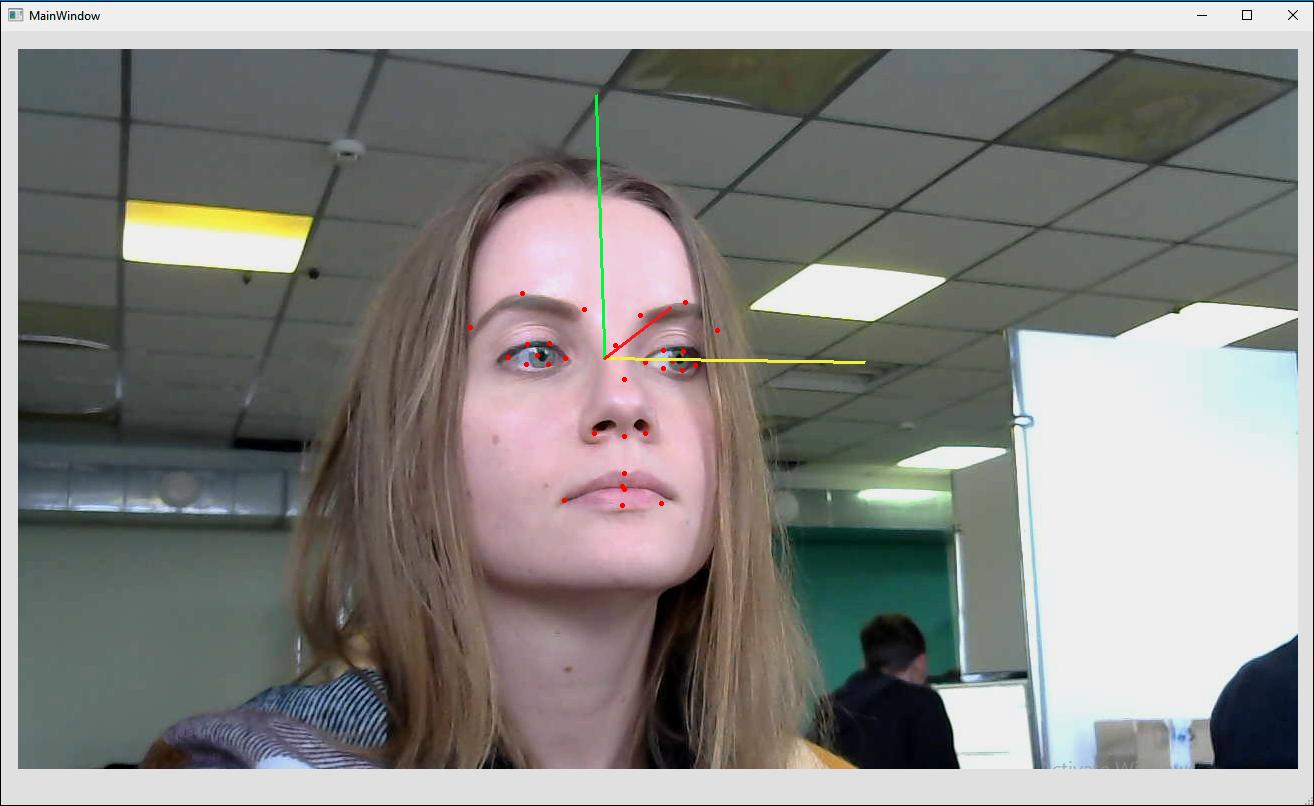
- Visualize the points – they'll be displayed on the face as little red circles.
drawfunction.cpp
//static
QImage DrawFunction::Draw(
    const Worker::DrawingData &
    {
        ...
        // draw facial points
        {
            ...
            pen.setColor(Qt::red);
            pen.setWidth(1);
            painter.setPen(pen);
            painter.setBrush(Qt::red);
            for(auto &point : points)
            {
                painter.drawEllipse(QPoint(point.x, point.y), 2, 2);
            }
        }
        ...
    }
- Run the project. You'll see anthropometric points on your face.
Displaying Head Rotation Angles
- The information about head rotation angles is also obtained from
pbio::RawSample.
drawfunction.cpp
//static
QImage DrawFunction::Draw(
    const Worker::DrawingData &data)
    {
        ...
        // draw angles
        {
            const pbio::RawSample::Angles angles = sample.getAngles();
        }
        ...
    }
- Include the headers
QMatrix3x3andQQuaternion. Using theQQuaternion::fromEulerAnglesmethod, get the rotation matrix.
drawfunction.cpp
#include <QMatrix3x3>
#include <QQuaternion>

...
//static
QImage DrawFunction::Draw(
    const Worker::DrawingData &data)
    {
        ...
        // draw angles
        {
            ...
            QMatrix3x3 rotation = QQuaternion::fromEulerAngles(
                angles.pitch,
                angles.yaw,
                angles.roll).toRotationMatrix();
        }
        ...
    }
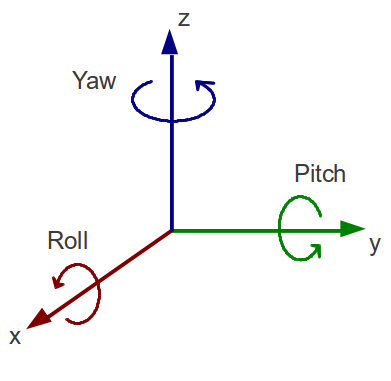
Note: In Face SDK, yaw (rotation along the Z axis), pitch (rotation along the Y axis), and roll (rotation along the X axis) rotation angles are used. Face SDK algorithm allows to detect faces in the following range of angles: yaw [-60; 60], pitch [-60; 60], roll [-30; 30].
- Since the image received from the camera and displayed on the screen is a mirror image of a user (the right part of the face is displayed on the left side of the image, and vise versa), we have to invert the direction of the Y axis (multiply it by -1) for correct visualization of angles.
drawfunction.cpp
//static
QImage DrawFunction::Draw(
    const Worker::DrawingData &data)
    {
        ...
        // draw angles
        {
            ...
            // invert y-axis direction
            for(int i = 0; i < 3; ++i)
                rotation(i, 1) *= -1;
        }
        ...
    }
- To visualize the angles, we have to calculate the midpoint between the eyes of a person
axis_origin, which will be the origin point for the vectors yaw, pitch, roll.
drawfunction.cpp
//static
QImage DrawFunction::Draw(
    const Worker::DrawingData &data)
    {
        ...
        // draw angles
        {
            ...
            const QPointF axis_origin(
                (sample.getLeftEye().x + sample.getRightEye().x) * 0.5f,
                (sample.getLeftEye().y + sample.getRightEye().y) * 0.5f);
        }
        ...
    }
- To make sure that the length of the yaw, pitch, roll vectors is proportional to the face size, we introduce the
axis_lengthcoefficient. It's half of the diagonal of the face bounding rectangleface_size.
drawfunction.cpp
//static
QImage DrawFunction::Draw(
    const Worker::DrawingData &data)
    {
        ...
        // draw angles
        {
            ...
            const float face_size = std::sqrt(
                std::pow((float)sample.getRectangle().width, 2.f)
                + std::pow((float)sample.getRectangle().height, 2.f));
            const float axis_length = face_size * 0.5f;
        }
        ...
    }
- Visualize the angles – vectors will be displayed in different colors (yellow, red, and green).
drawfunction.cpp
//static
QImage DrawFunction::Draw(
    const Worker::DrawingData &data)
    {
        ...
        // draw angles
        {
            ...
            const QColor axis_colors[] = {
                QColor(255, 255, 50), // x-axis
                QColor(50, 255, 50),  // y-axis
                QColor(255, 50, 50)   // z-axis
            };
        }
        ...
    }
- Draw the vectors in the loop. The starting point for vectors is the point between the person's eyes. The endpoint for vectors equals to the projection of the vector on the image plane
QPointFmultiplied by theaxis_lengthcoefficient and plotted from the starting point.
drawfunction.cpp
//static
QImage DrawFunction::Draw(
    const Worker::DrawingData &data)
    {
    ...
        // draw angles
        {
            ...
            pen.setWidth(3);
            for(int c = 0; c < 3; ++c)
            {
                pen.setColor(axis_colors[c]);
                painter.setPen(pen);
                painter.drawLine(
                    axis_origin,
                    axis_origin + axis_length * QPointF(rotation(0, c), rotation(1, c)));
            }
            ...
        }
    }
- Run the project. You'll see the anthropometric points and head rotation angles.