Face Capturing
Face detection consists of several stages:
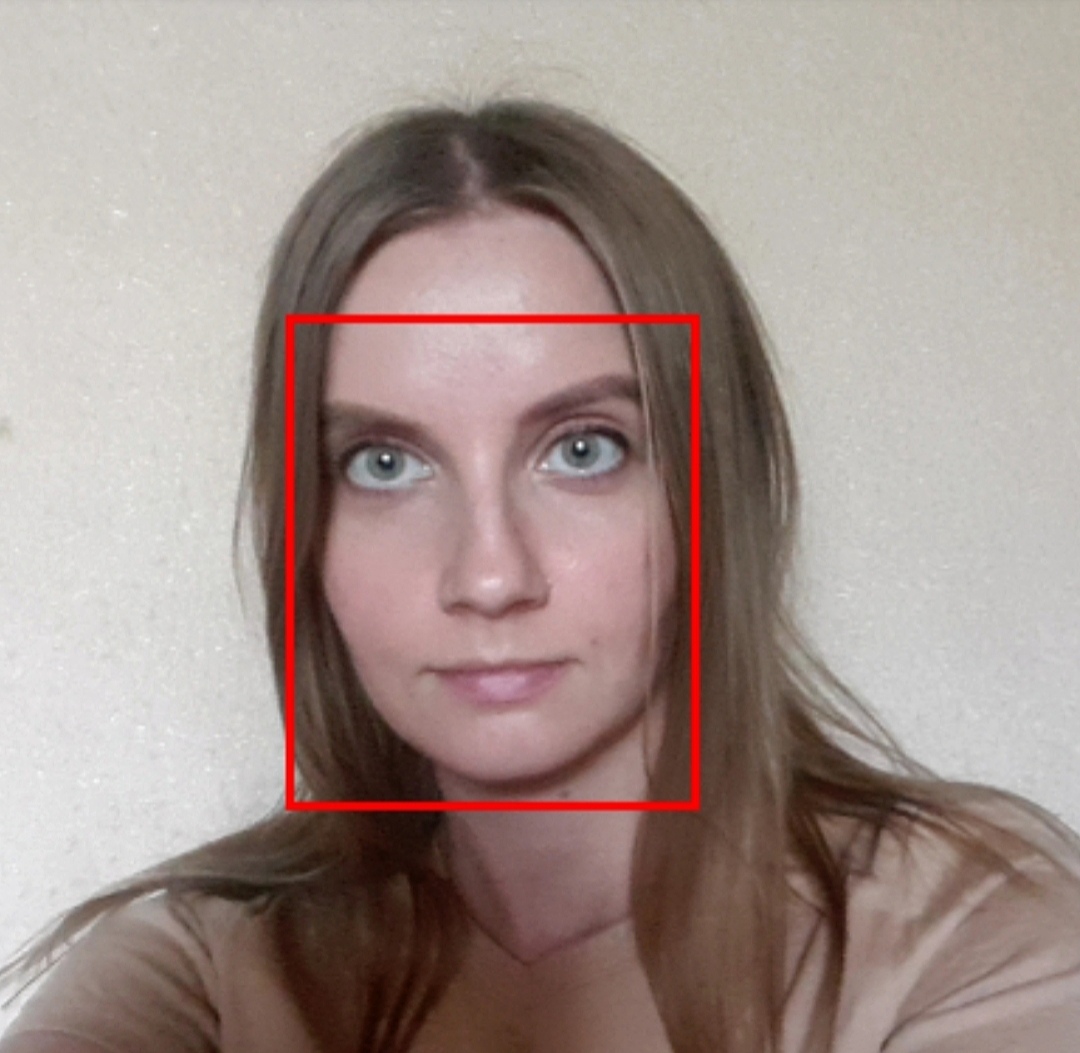
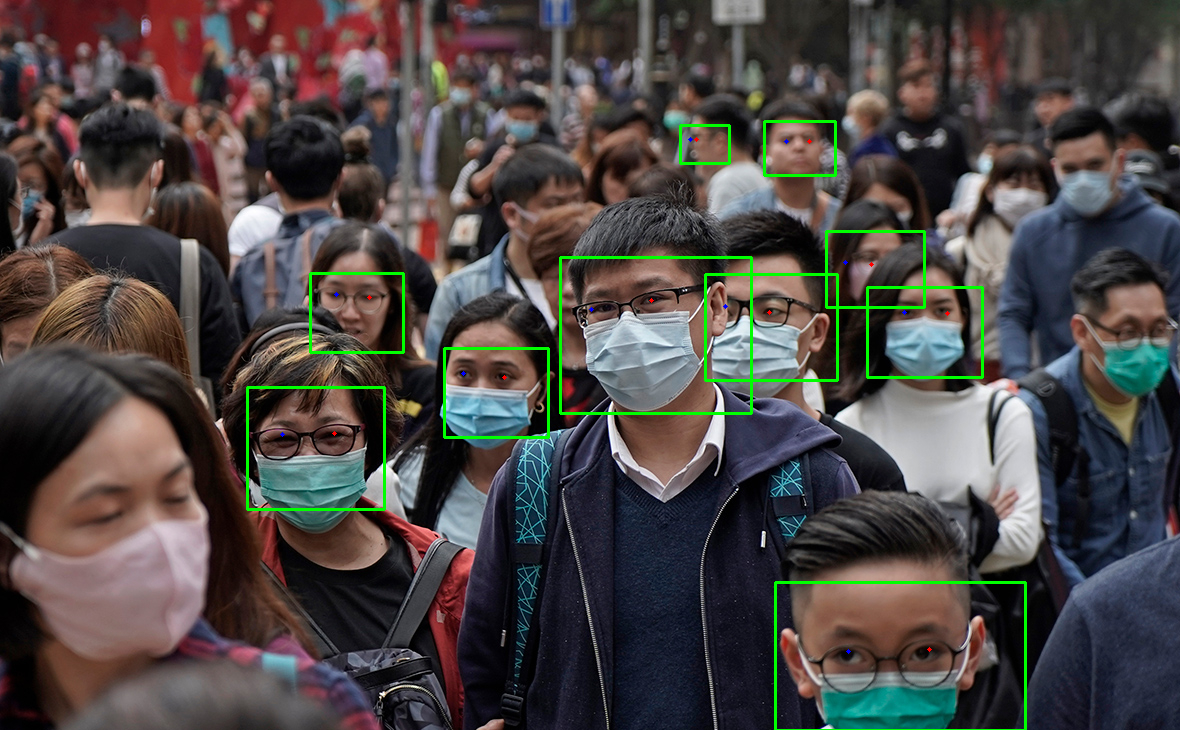
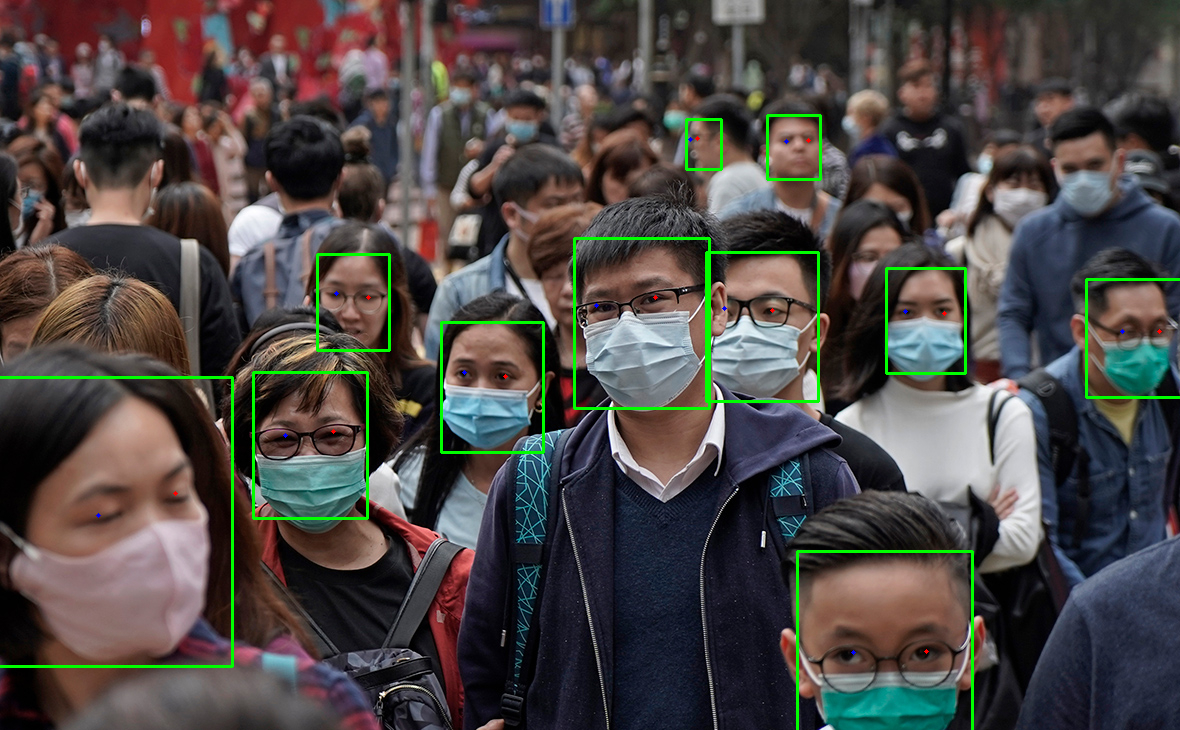
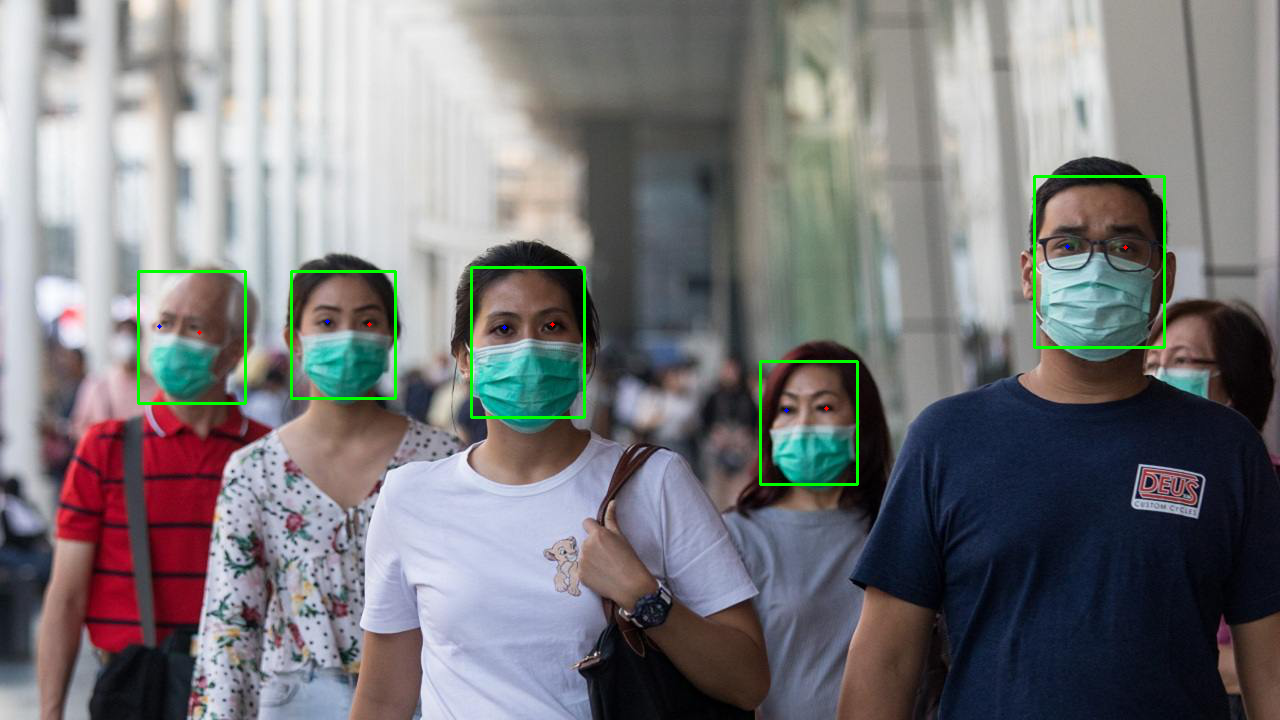
- Detecting a face in the image. The result of this stage is a rectangle (a frame) around the detected face. There are several types of detectors that are described below.
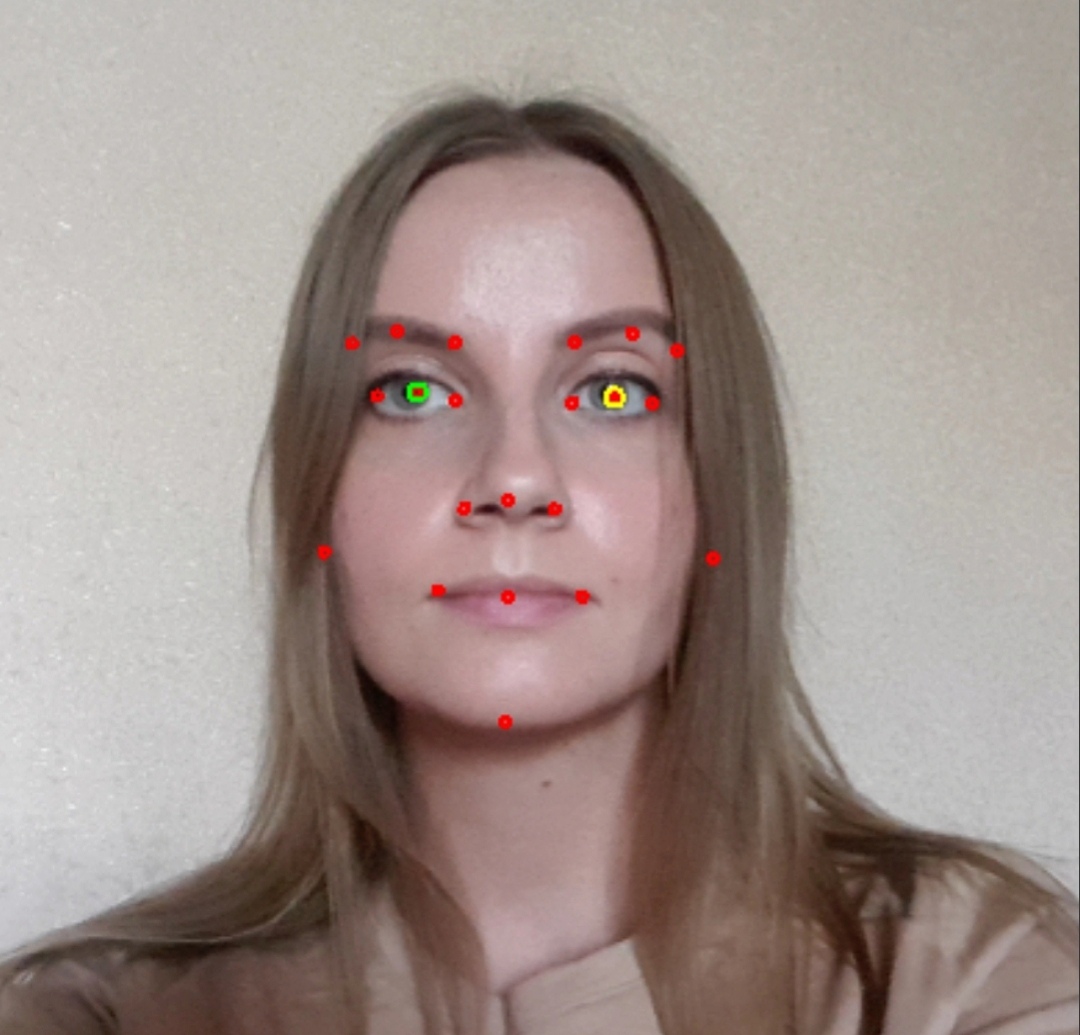
- Fitting (positioning) of anthropometric points. The result of this stage is a set of anthropometric points with 2D/3D coordinates linked to a specific detected face. There are several types of fitters that use different sets of anthropometric points, which are described below.
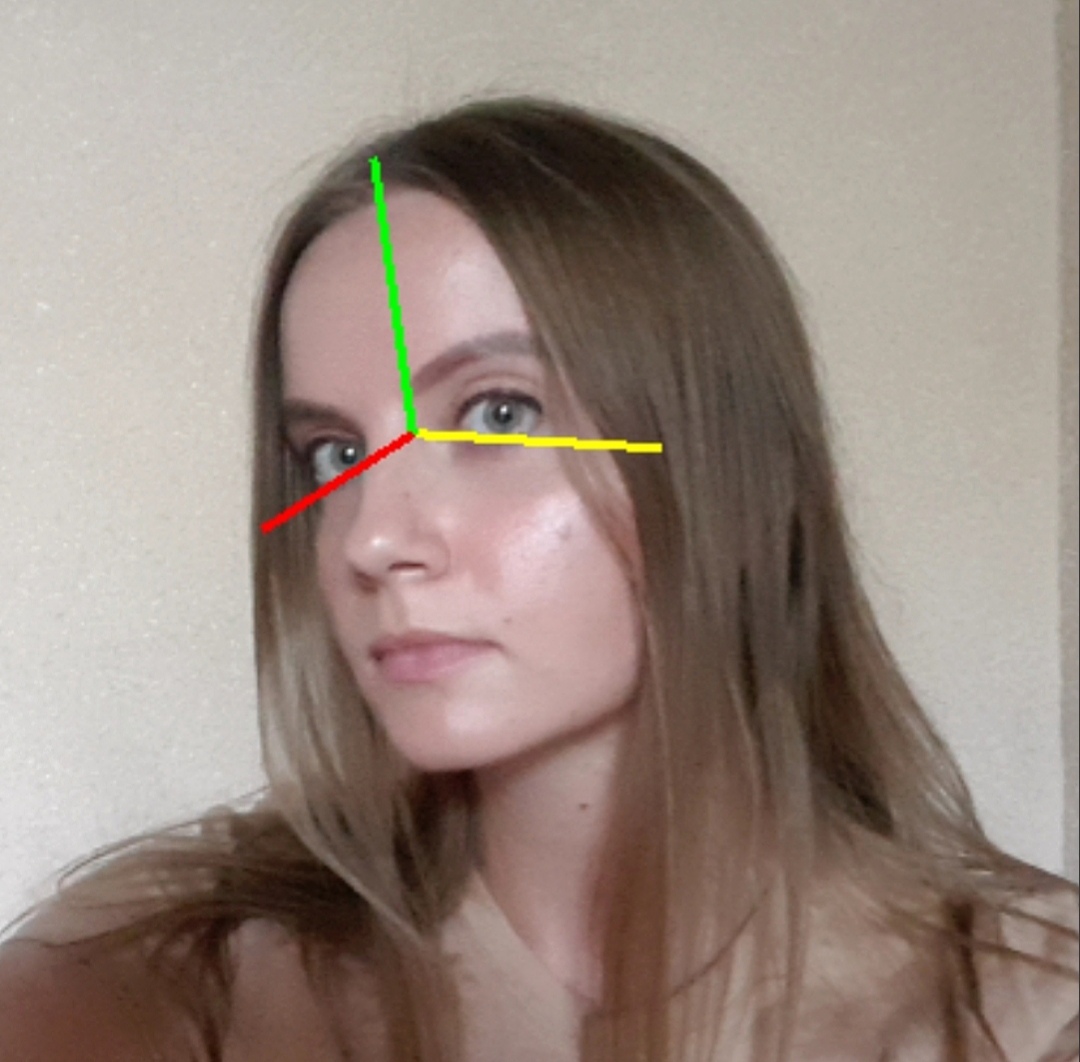
- Calculating head rotation angles relative to the observation axis. The result of this stage is three head rotation angles: pitch, yaw, roll. The accuracy of these angles depends on the set of anthropometric points used.
The Capturer class is used for face detection. A configuration file should be specified when creating a class object. The configuration file contains the detector type to be used and the type of set of anthropometric points to be used (see Configuration files]). You can also configure various detection parameters in the configuration file that affect the quality and speed of the entire algorithm. The detector and the set of anthropometric points are specified in the name of the configuration file, for example: common_capturer_blf_fda_front.xml - the blf detector, the fda set of points.
There is also another option of face detection combined with face tracking in a video stream. In this case, the algorithm assumes that a set of consecutive frames from the video is provided at the input, therefore, faces are tracked from frame to frame. In addition to the stages described above, the face tracking stage is added and a unique identifier is assigned to each face. This id does not change from the moment a face is detected in the video stream until the moment it is lost. Such configurations contain the word video in the file name, for example, common_video_capturer_fda.xml. Currently, two trackers are available:
- common_video_capturer - provides high speed, but the quality is lower compared to fda_tracker_capturer
- fda_tracker_capturer - provides high quality, but the speed is lower compared to common_video_capturer
Detectors
Currently, the following detectors are available:
- LBF – an outdated detector, not recommended for use;
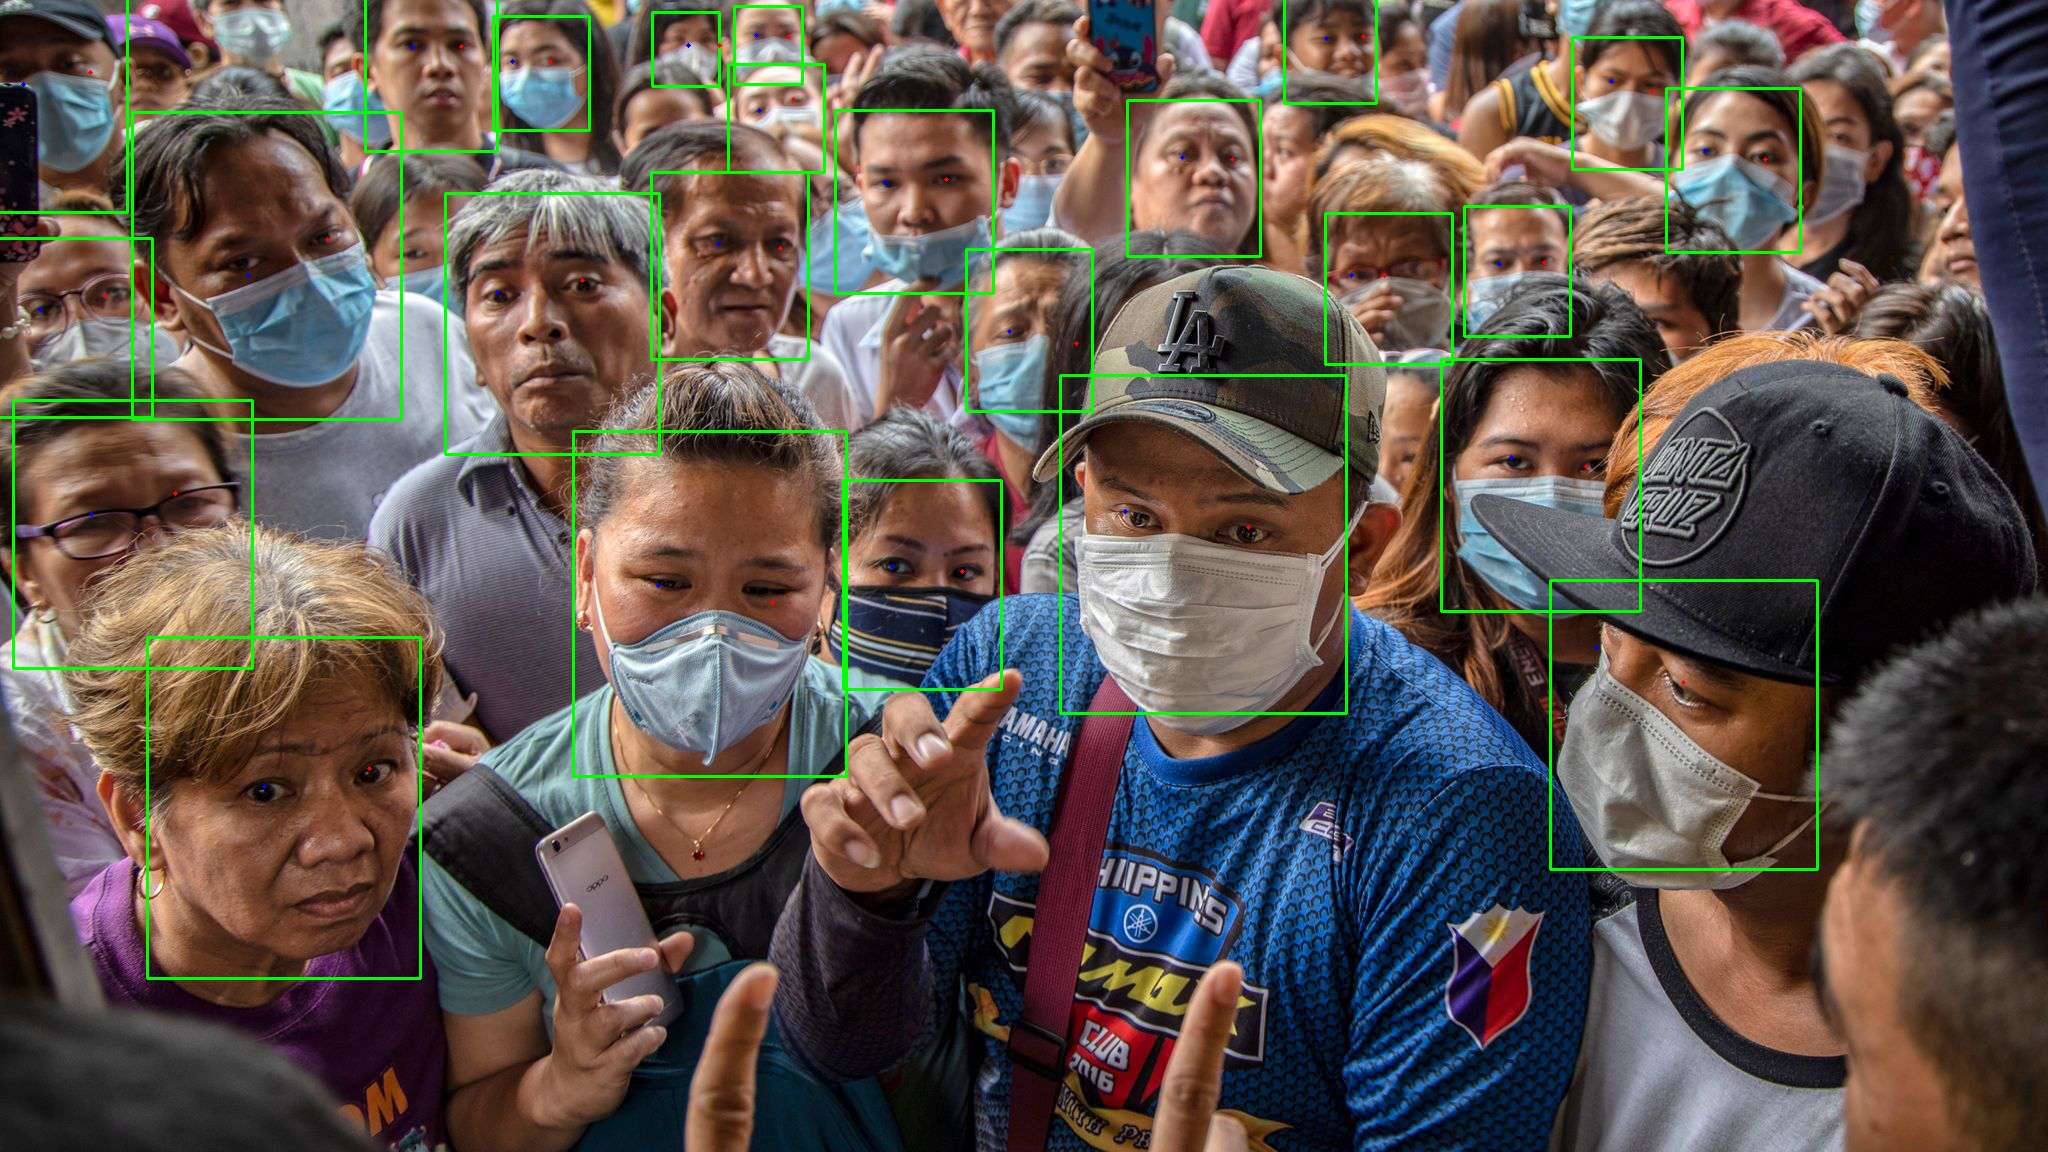
- BLF – a detector that provides higher quality and faster detection than LBF for faces of a medium size and larger (including masked faces). On Android, you can use GPU acceleration (enabled by default);
- REFA – a detector that is slower than the LBF and BLF detectors, but at the same time guarantees a better quality of face detection of various sizes (including masked faces). Recommended for use in expert systems;
- ULD – a new detector that is faster than REFA. This detector allows you to detect faces of various sizes (including masked faces).
For LBF, REFA, ULD detectors, you can set the size of the detected faces using the min_size parameter (see the Detailed Info about Capturer Configuration Parameters section). Decreasing the value of this parameter increases the detection time.
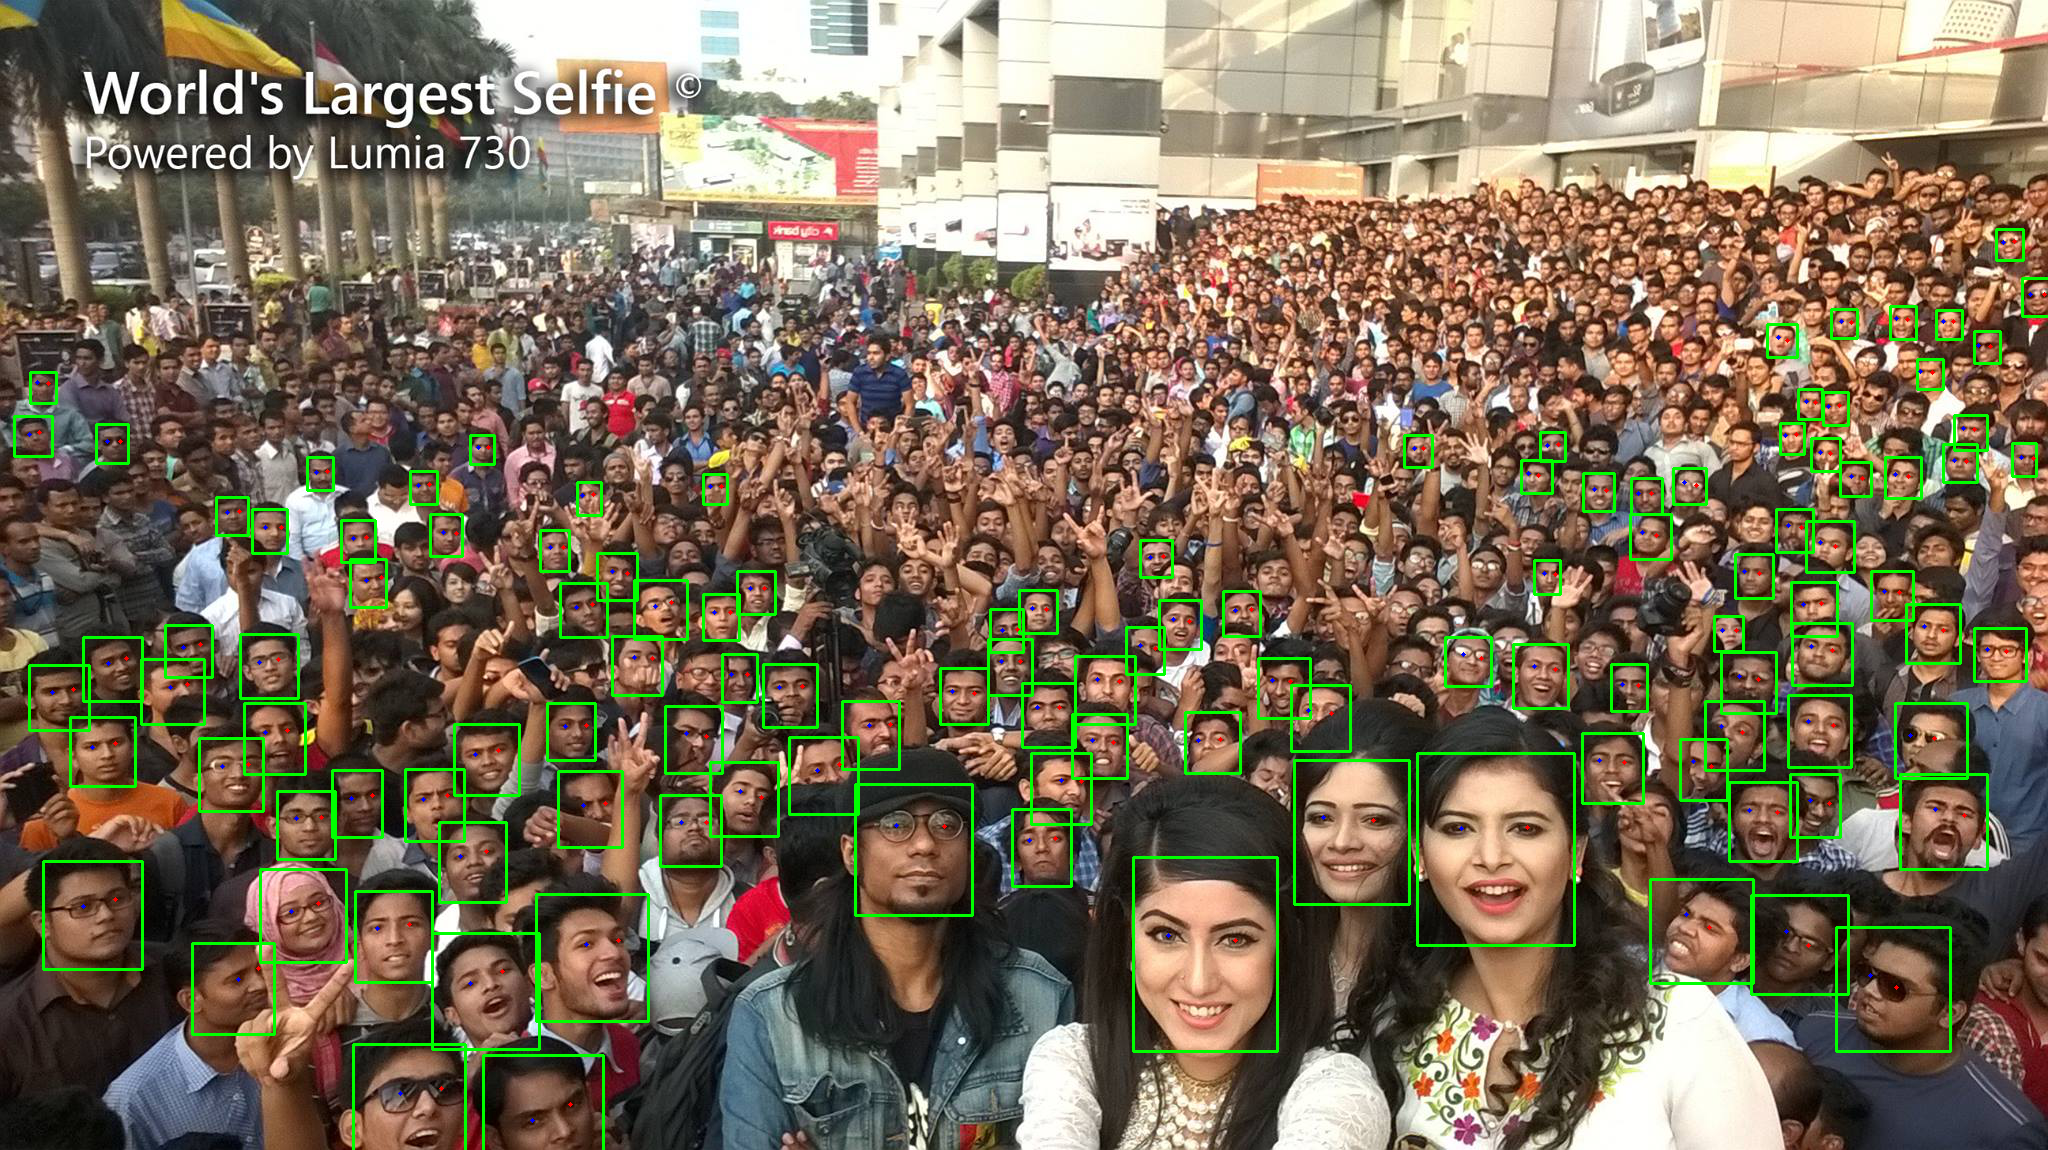
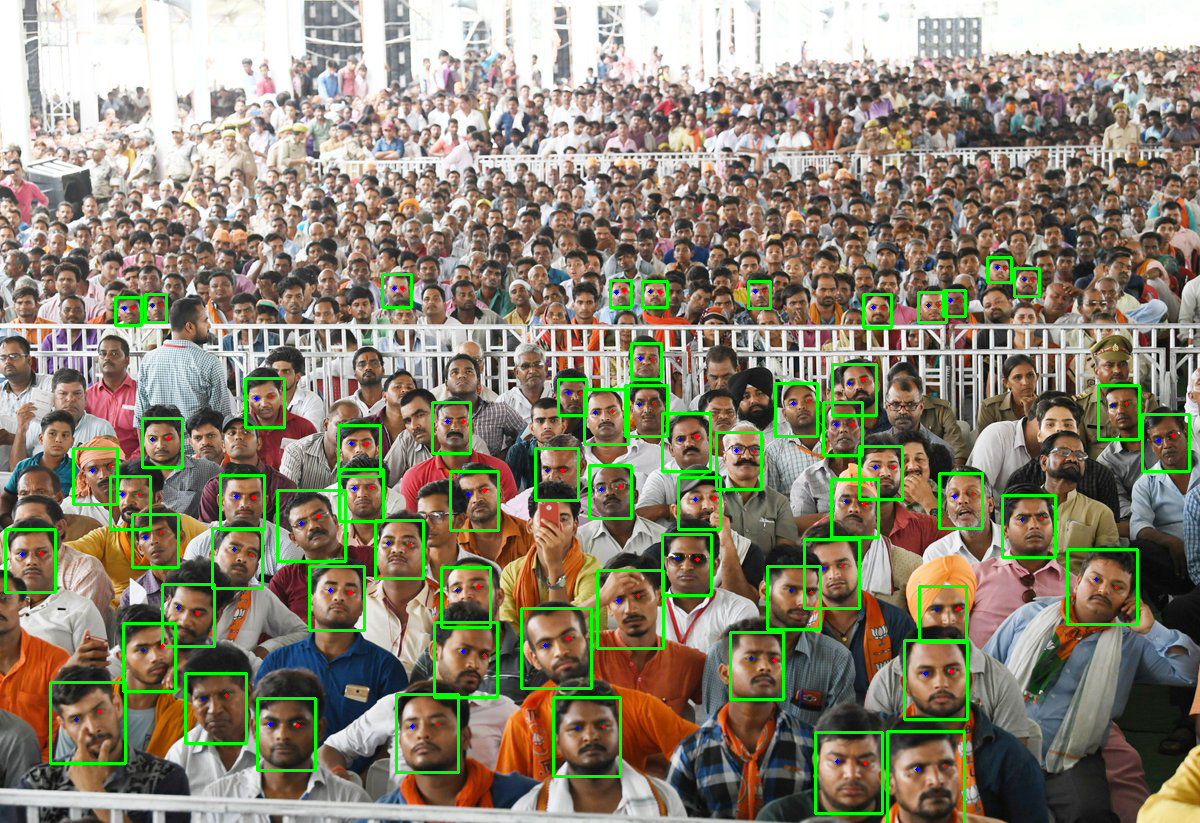
Below you can see the examples of the operation of different detectors in different conditions.
Click here to expand the table
| BLF (score_threshold=0.6) | REFA (min_size=0.2, score_threshold=0.89) | ULD (min_size=10, score_threshold=0.7) |
 |  |  |
 |  |  |
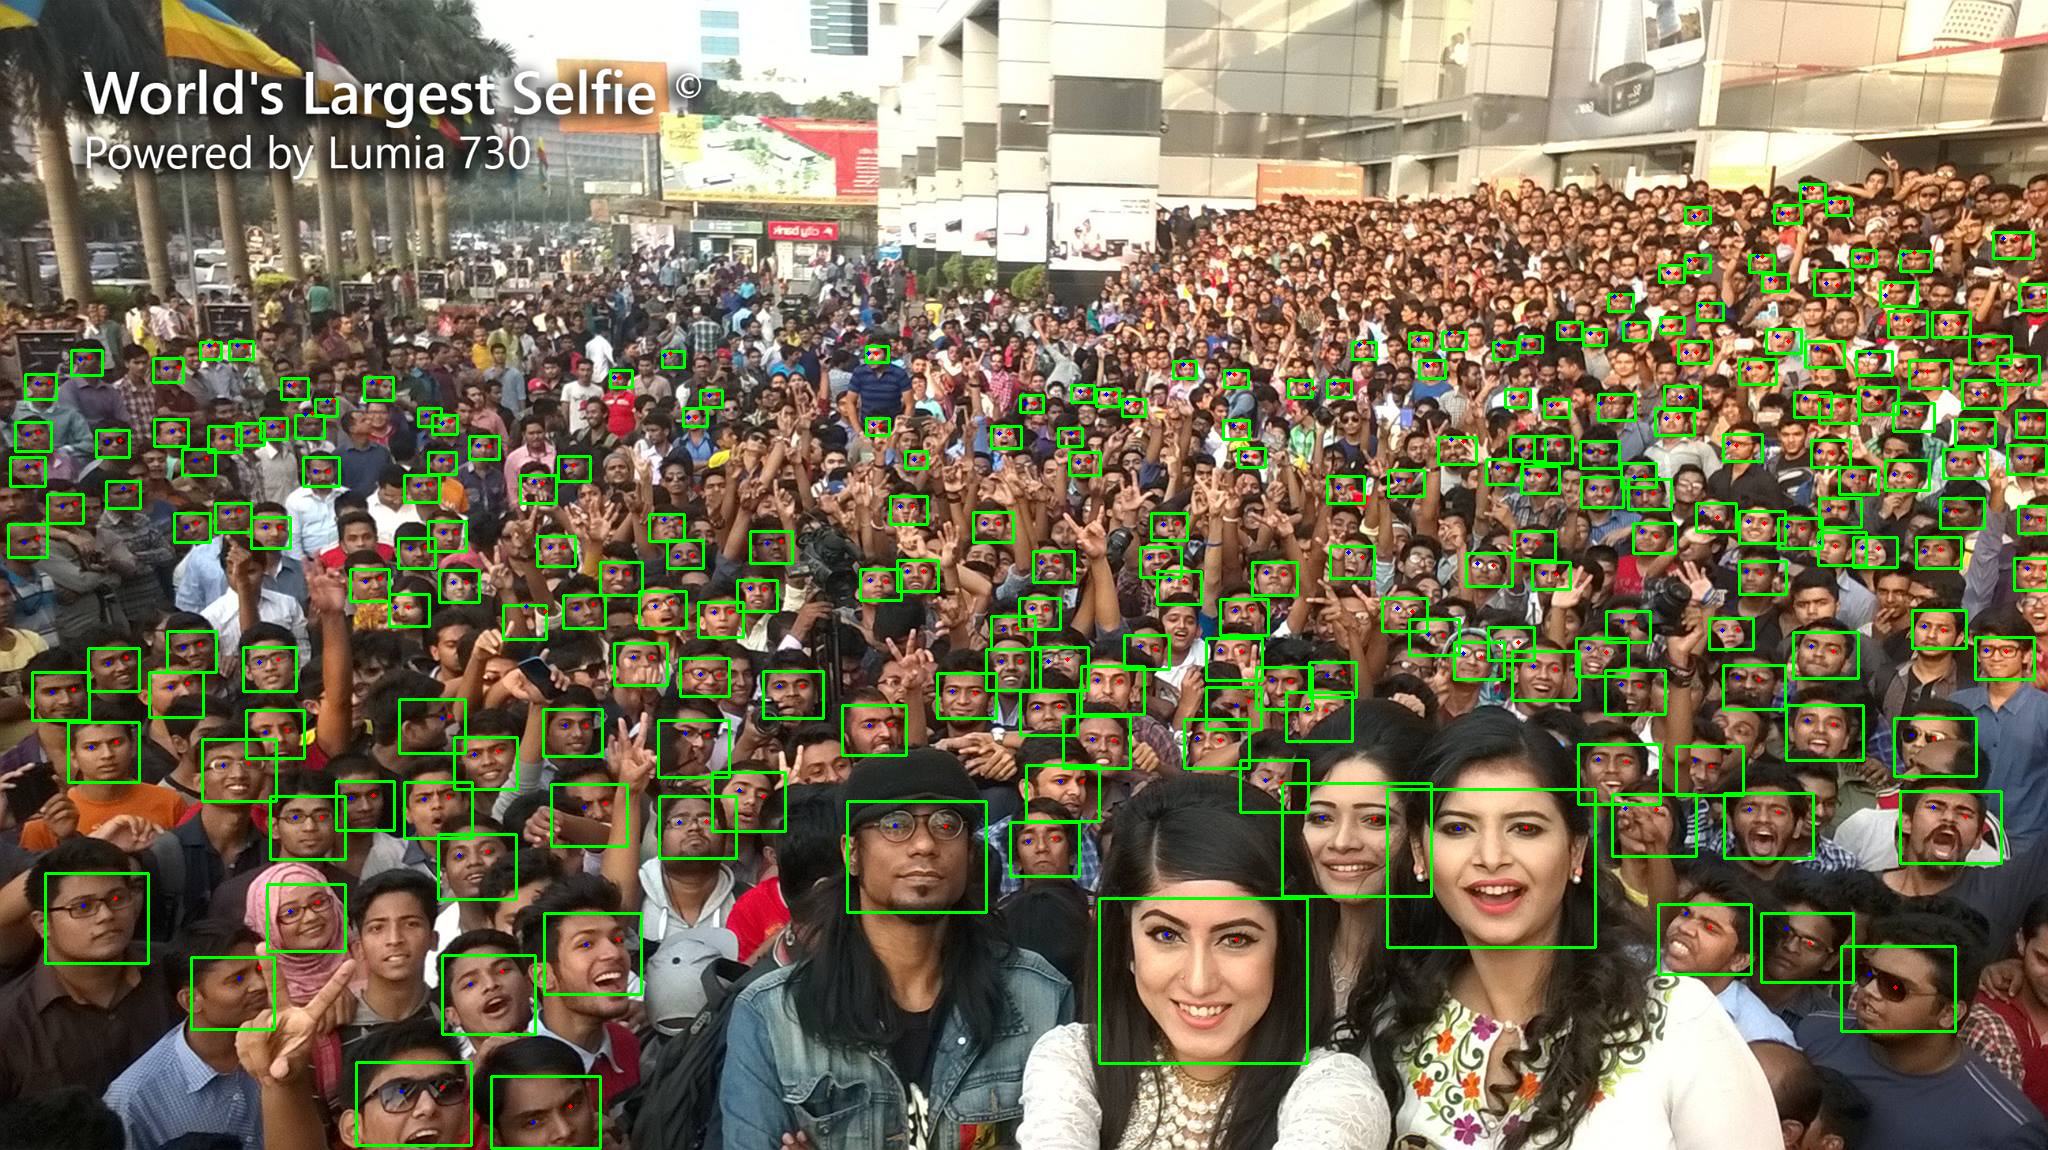
Below you can see the examples of the operation of different detectors at different thresholds.
Click here to expand the table
| ULD (score_threshold=0.4) | ULD (score_threshold=0.7) | REFA (score_threshold=0.89) |
 |  |  |
 |  |  |
 |  |  |
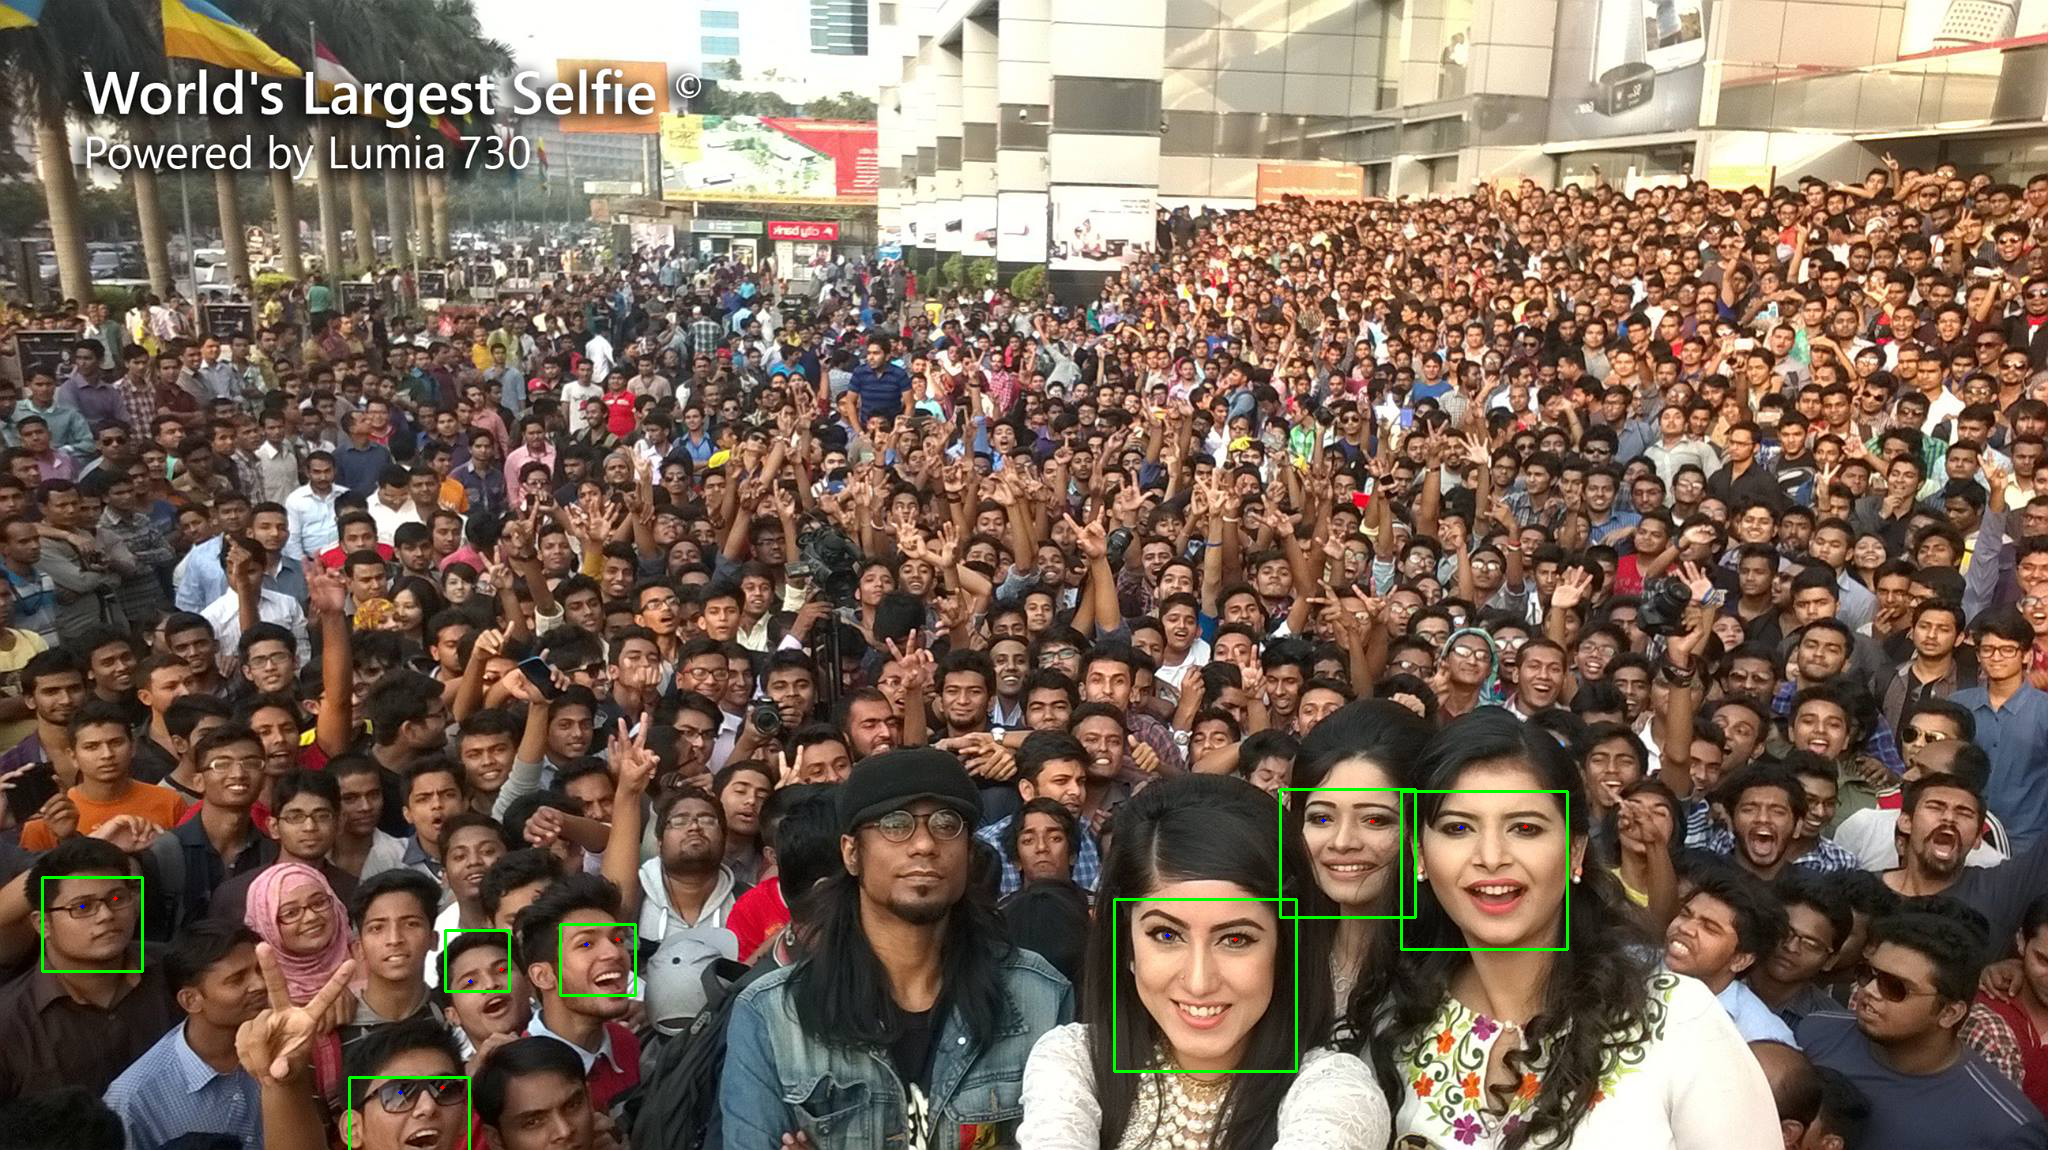
When a detector is created, you can use it to detect / track faces. There are two ways to pass an image to the detector:
- pass the data of the decoded image to the method
Capturer.capture(RawImage image), using theRawImageclass (see Samples]) - pass the data of the encoded image in JPG, PNG, TIF or BPM format to the method
Capturer.capture(byte[] data)
In both cases, the result is the vector of detected / tracked faces (RawSample is the object storing the captured face).
For a tracker, you can also call the Capturer.resetHistory method to start tracking on a new video sequence.
Anthropometric Points
Note: Learn how to display anthropometric points and head rotation angles in our tutorial].
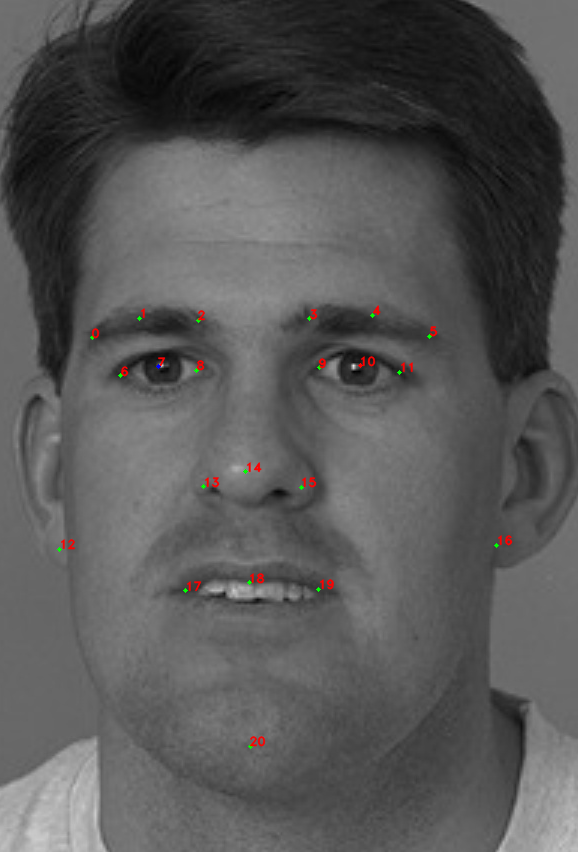
There are four sets of anthropometric points: esr, singlelbf, doublelbf, fda, mesh.
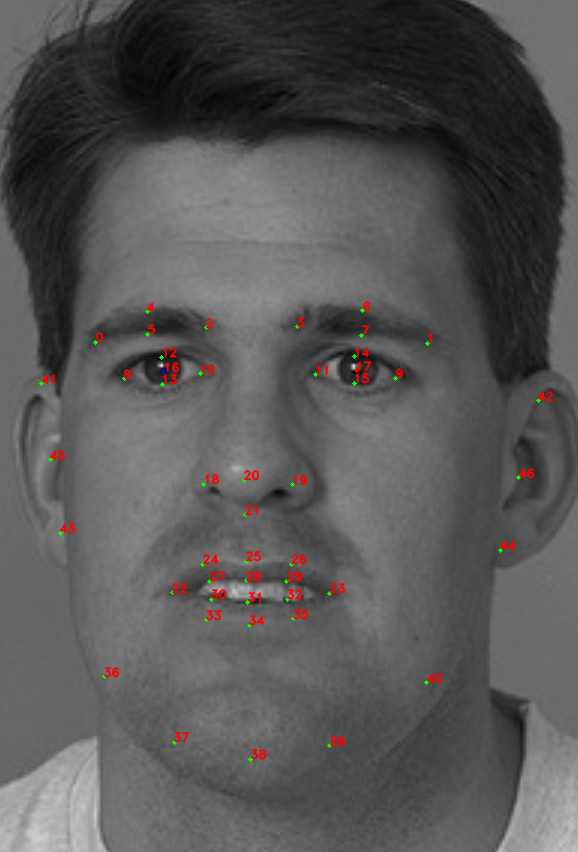
- The esr set is our first set that was the only set available in previous SDK versions. The esr set contains 47 points.
- The singlelbf and doublelbf provide higher accuracy than esr. The singlelbf set contains 31 points. The doublelbf set contains 101 points. Actually, the doublebf set consists of two concatenated sets – the last 31 points of doublelbf duplicate the singlelbf set (in the same order).
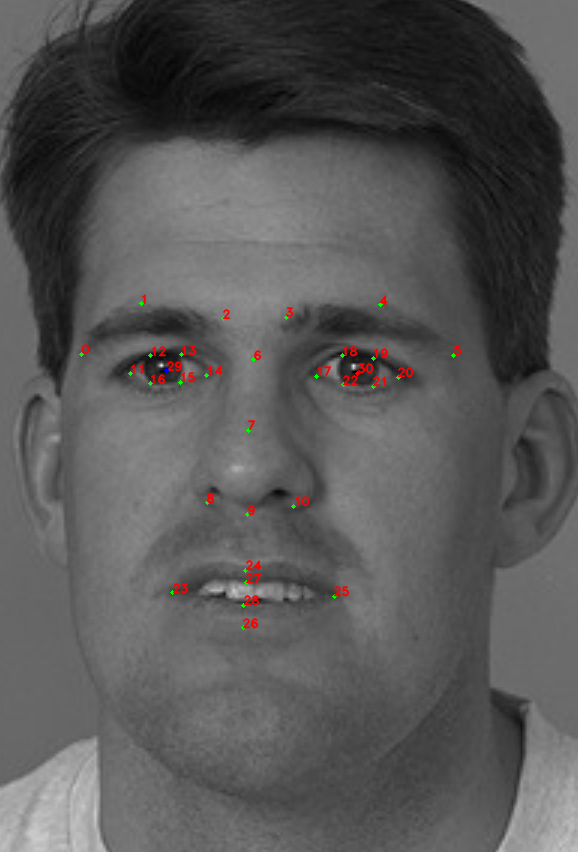
- The fda provides high accuracy in a wide range of facial angles (up to the full profile), in contrast to the previous sets, so we recommend you to use detectors with these set. However, recognition algorithms still require face samples to be close to frontal. The fda set contains 21 points.
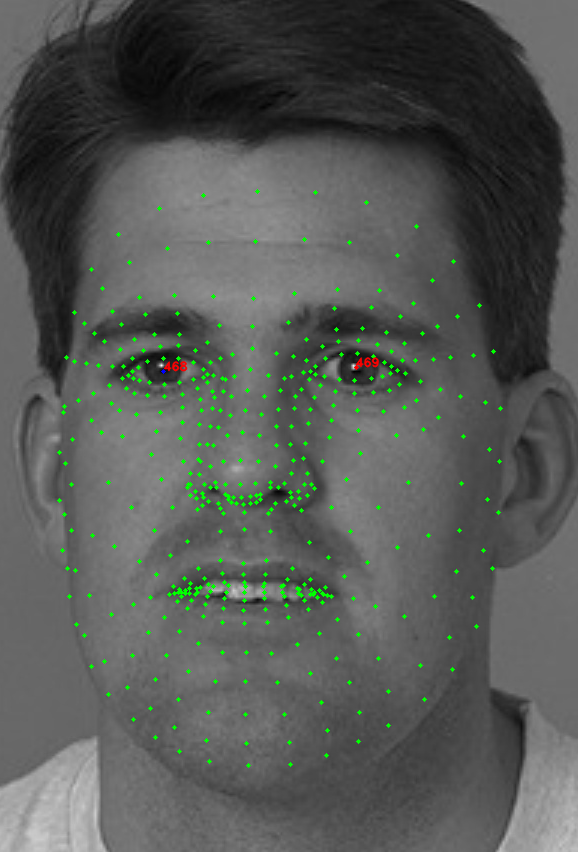
- At the moment, the mesh set is the newest. It contains 470 3D points of a face. Use this set to get a 3D face mesh.
| fda set of points. RawSample.getLeftEye returns point 7. RawSample.getRightEye returns point 10 | esr set of points. RawSample.getLeftEye returns point 16. RawSample.getRightEye returns point 17 |
|---|---|
 |  |
| singlelbf set of points. RawSample.getLeftEye returns point 29. RawSample.getRightEye returns point 30 | first 70 points of doubleldb set of points (the rest 31 points are taken from singlelbf). RawSample.getLeftEye returns point 68. RawSample.getRightEye returns point 69 |
|---|---|
 |  |
| mesh set of points. RawSample.getLeftEye returns point 468. | RawSample.getRightEye returns point 469 |
|---|---|
 |  |
Capturer Class Reference
To capture faces, you should create a Capturer object using FacerecService.createCapturer, passing the path to the configuration file or the FacerecService.Config object. If you pass the path to the configuration file, the default settings will be used. By using FacerecService.Config you can override any numerical option inside the config file. Also, some parameters can be changed in the existing Capturer object with the Capturer.setParameter method. See the Capturer usage examples here.
The type and characteristics of the capturer depend on the configuration file or the FacerecService.Config object passed to the FacerecService.createCapturer member function.
Note: We recommend you to use VideoWorker for face tracking on video streams. When VideoWorker is created with matching_thread=0 and processing_thread=0, then the standard Face Detector license] is used.
Capturer Usage Examples
First Example
- C++
- C#
- Java
- Python
pbio::Capturer::Ptr capturer = service->createCapturer("common_capturer4.xml");
Capturer capturer = service.createCapturer("common_capturer4_lbf.xml");
final Capturer capturer = service.createCapturer(service.new Config("common_capturer4_lbf.xml"));
capturer = service.create_capturer(Config("common_capturer4_lbf.xml"))
Second Example
- C++
- C#
- Java
- Python
pbio::FacerecService::Config capturer_config("common_capturer4.xml");
capturer_config.overrideParameter("min_size", 200);
pbio::Capturer::Ptr capturer = service->createCapturer(capturer_config);
FacerecService.Config capturerConfig = new FacerecService.Config("common_capturer4_lbf.xml");
capturerConfig.overrideParameter("min_size", 200);
Capturer capturer = service.createCapturer(capturerConfig);
FacerecService.Config capturerConfig = service.new Config("common_capturer4_lbf.xml");
capturerConfig.overrideParameter("min_size", 200);
final Capturer capturer = service.createCapturer(capturerConfig);
capturer_config = Config("common_capturer4_lbf.xml")
capturer_config.override_parameter("min_size", 200)
capturer = service.createCapturer(capturer_config)
Third Example
- C++
- C#
- Java
pbio::Capturer::Ptr capturer = service->createCapturer("common_capturer4.xml");
capturer->setParameter("min_size", 200);
capturer->setParameter("max_size", 800);
// capturer->capture(...);
// ...
capturer->setParameter("min_size", 100);
capturer->setParameter("max_size", 400);
// capturer->capture(...);
Capturer capturer = service.createCapturer("common_capturer4_lbf.xml");
capturer.setParameter("min_size", 200);
capturer.setParameter("max_size", 800);
// capturer.capturer(...);
// ...
capturer.setParameter("min_size", 100);
capturer.setParameter("max_size", 400);
// capturer.capture(...);
Capturer capturer = service.createCapturer(service.new Config("common_capturer4_lbf.xml"));
capturer.setParameter("min_size", 200);
capturer.setParameter("max_size", 800);
// capturer.capturer(...);
// ...
capturer.setParameter("min_size", 100);
capturer.setParameter("max_size", 400);
// capturer.capture(...);
Face Cropping
To crop the face, you can call the RawSample.cutFaceImage method. The image of a cropped face will be saved in a provided binary stream encoded in a specified format.
Available face cropping types (RawSample.FaceCutType):
- FACE_CUT_BASE - Unspecified cropping (any sample type).
- FACE_CUT_FULL_FRONTAL - ISO/IEC 19794-5 Full Frontal (for ID, travel documents) (only frontal sample type). It is used for saving face images in electronic biometric documents.
- FACE_CUT_TOKEN_FRONTAL - ISO/IEC 19794-5 Token Frontal (fixed eye positions) (only frontal sample type).
To preview the cropping, call the RawSample.getFaceCutRectangle method by specifying the cropping type. As a result, you will have four points – the corners of the rectangle that will be used for cropping.
See the example of usage in Samples].
RawSample Class Reference
With RawSample you can:
- get track id (
RawSample.getID) – only if the sample was captured from a tracker - get a face rectangle (
RawSample.getRectangle), angles (RawSample.getAngles), left / right eyes (RawSample.getLeftEye/RawSample.getRightEye, see Anthropometric Points), anthropometric points (RawSample.getLandmarks, see Anthropometric Points) – only if the face is frontal (i.e captured with frontal detector / tracker) - crop the face (see Face Cropping)
- downscale an internal face image to suitable size (
RawSample.downscaleToPreferredSize) - serialize an object in a binary stream (
RawSample.saveorRawSample.saveWithoutImage), you can deserialize it later usingFacerecService.loadRawSampleorFacerecService.loadRawSampleWithoutImage - pass the estimates of the age, gender, quality and liveness to the methods (see Face Estimation])
- provide it to
Recognizer.processingfor template creating (see Face Identification], test_identify])
Detailed Info about Capturer Configuration Parameters
Click here to see the list of parameters inside the configuration files that can be changed using the FacerecService.Config.overrideParameter object
max_processed_widthandmax_processed_height– (for trackers only) limit the size of the image that is passed to the internal detector of new faces.min_sizeandmax_size– minimum and maximum face size for detection (for trackers: the size is defined for an image already downscaled according to the restrictionsmax_processed_widthandmax_processed_height).min_neighbors– an integer detector parameter. Please note that large values require higher detection confidence. You can change this parameter based on the situation, for example, increase the value if a large number of false detections are observed or decrease the value if a large number of faces are not detected. Do not change this parameter if you are not sure.min_detection_period– (for trackers only) a real number that means the minimum time (in seconds) between two runs of the internal detector. A zero value means ‘no restrictions’. Used to reduce the processor load. Large values increase the latency in detection of new faces.max_detection_period– (for trackers only) an integer that means the max time (in frames) between two runs of the internal detector. A zero value means ‘no restrictions’. For example, if you are processing a video offline, you can set the value to1so as not to miss a single person.max_occlusion_time_wait– (for trackers only) a real number in seconds. When the tracker detects face occlusion, it holds the face position and tries to track it on new frames during this time.fda_max_bad_count_wait– an integer. Whenfda_trackerdetects the decline in the face quality, it tries to track this face with the general purpose tracker (instead of the fda method designed and tuned for faces) during at mostfda_max_bad_count_waitframes.base_angle– an integer:0,1,2, or3. Set camera orientation:0meansstandard(default),1means+90 degrees,2means-90 degrees,3means180 degrees.fake_detections_cnt– an integer. Number of start positions to search a face usingvideo_worker_fdatracker_fake_detector.xml.fake_detections_period– an integer. Each start position will be used once infake_detections_periodframes.fake_rect_center_xN,fake_rect_center_yN,fake_rect_angleN,fake_rect_sizeN– real numbers. Parameters of start positions. N is from0tofake_detections_cnt – 1including.fake_rect_center_xN– x coordinate of a center relative to the image width.fake_rect_center_yN– y coordinate of a center relative to the image height.fake_rect_angleN– roll angle in degrees.fake_rect_sizeN– size relative to max(image width, image height).downscale_rawsamples_to_preferred_size– an integer,1meansenabled,0meansdisabled. Default value isenabled. When enabled,Capturerdownscales each sample to the suitable size (seeRawSample.downscaleToPreferredSize) in order to reduce memory consumption. However, it decreases the performance. It's recommended to disabledownscale_rawsamples_to_preferred_sizeand useRawSample.downscaleToPreferredSizemanually forRawSamplesthat you need to save or keep in RAM for a long time.