Configuration
You can configure OMNI Agent through the dashboard or by editing files from OMNIAgent folder available at the address:
- Linux: ~/.local/share/OMNIAgent
- Windows: %LocalAppData%/OMNI Agent
Configuration files for editing are located in the config folder. For your convenience, configuration files with default settings are available for review in the config.default folder. Note that any value changed in config files takes precedence over the default configuration.
The following basic settings can be modified through the dashboard or by editing run_params.json and log_params.json configuration files.
After adding or changing values in the configuration files, restart OMNI Agent.
Basic settings
Setting through configuration file
You can configure all parameters specified below by editing config/run_params.json.
To enable/disable the body detection, set the value for
pipelines.body_detector.enabled:(Boolean)astrue(enabled) orfalse(disabled).To enable/disable the face detection, set the value for
pipelines.face.enabled:(Boolean)astrue(enabled) orfalse(disabled). Note: Disabling this module also stops Agent synchronization with the local database.To enable/disable age and gender estimation, set the value for
pipelines.age_gender.enabled:(Boolean)astrue(enabled) orfalse(disabled).To enable/disable estimation of emotions, set the value for
pipelines.emotions.enabled:(Boolean)astrue(enabled) orfalse(disabled).To enable/disable the mask detector, set the value for
pipelines.mask_attribute.enabled:(Boolean)astrue(enabled) orfalse(disabled).
Setting via dashboard
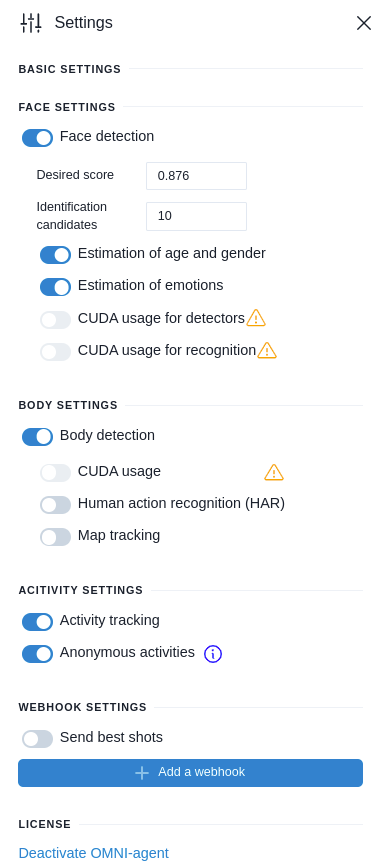
The settings listed above can also be enabled/disabled via OMNI Agent dashboard. To do this, select Settings at OMNI Agent dashboard and activate the necessary options (Body tracking, face tracking, mask detection, age and gender estimation, emotion estimation).
Anonymous mode
OMNI Agent has the anonymous mode enabled by default. In the anonymous mode, face images aren’t transferred to OMNI Platform that ensures personal data protection and excludes the possibility of person recognition outside the system. You can enable or disable the anonymous mode at OMNI Agent dashboard or by editing config/run_params.json.Setting through configuration file
For configuration via config/run_params.json set the value for anonymous_mode:(Boolean) as true (module enabled) or false (module disabled).
Setting via dashboard
To enable/disable the anonymous mode through the dashboard, click on Settings icon at OMNI Agent web page and select an appropriate option in the opened tab.
Events
You can enable/disable event transmission through OMNI Agent's dashboard (for HAR events only) or by editing the config/run_params.json file.
Setting via dashboard
To enable/disable the events through the dashboard, click on Settings icon at OMNI Agent web page and enable Human Action Recognition (HAR).
Setting through configuration file
For configuration via config/run_params.json set the value for enable_activities, enable_identification, enable_non_identification, enable_har, enable_line_crossing and enable_roi_crossing as true (module enabled) or false (module disabled).
In the identification events, data on candidates – profiles from the database with which the identification occurred (a face from the submitted frame and a face from the database have a high degree of similarity) are transmitted. The number of allowable candidates can be specified in the field:
pipelines.face.video_worker_override_parameters.search_k: int – default value is10
Event cooldown
Event cooldown is a time interval that is counted from the first detection of an event, and during which the sending of repeated HAR and identification events (duplicates), caused by changes in perspectives, head rotations, people crossing tracks or brief obstructions, is suspended.
To configure cooldowns, open the config/run_params.json file and change the values in the following fields:
events.har_cooldown_interval: int - default value5000– Cooldown of HAR events (in ms).events.same_human_identification_cooldown_interval: int – default value5000– Cooldown of identification events (in ms).
Proxy server
Setting via dashboard
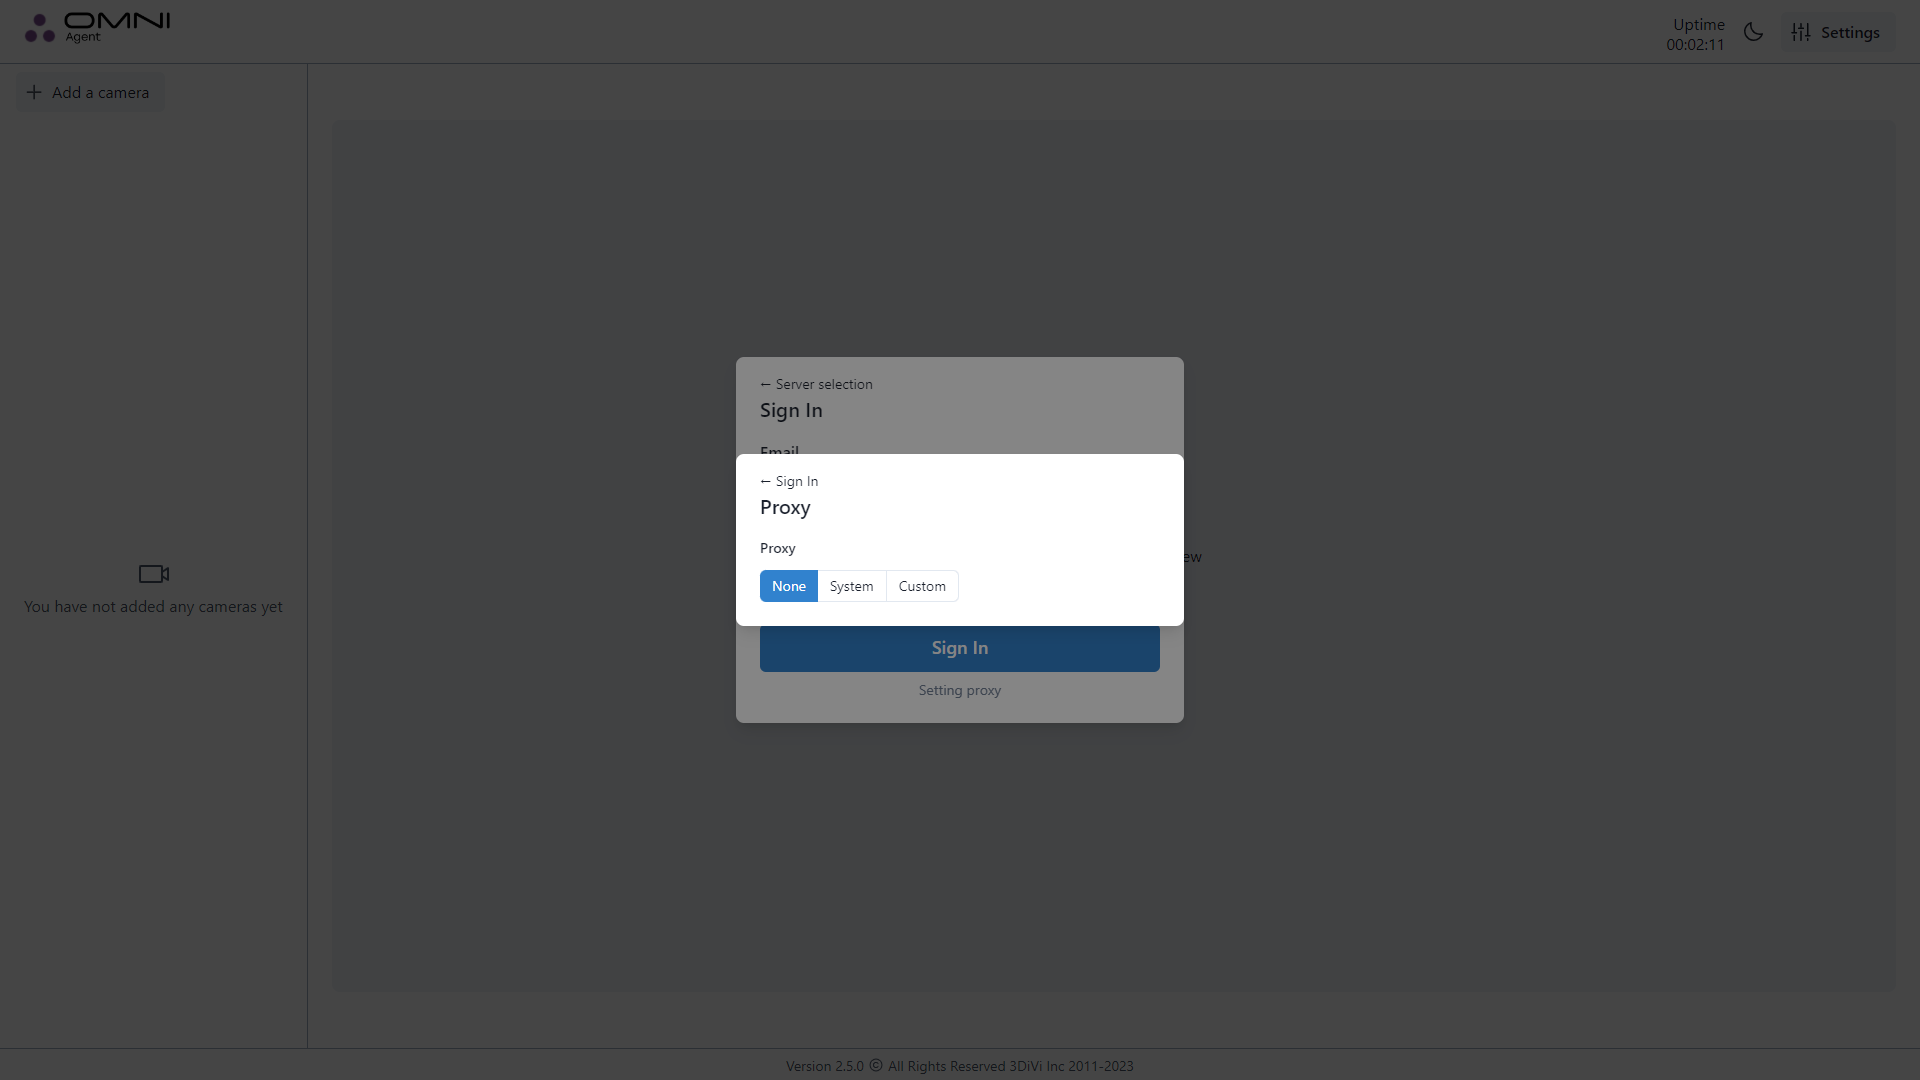
If the user gets access to the Internet through a proxy server, this connection should also be enabled to install and configure OMNI Agent. To use a proxy server, click on Settings icon at OMNI Agent dashboard and select a system or custom proxy server in the opened tab. When choosing a custom proxy server, enter its address in a special field. After changes are completed, click the Save button.
Port of web configurator
Setting through configuration file
You can configure all parameters specified in this section by editing config/run_params.json.
By default, the web configurator runs on port 8080. To change the port, add the http_server_port: (int) field in the configuration file and specify the desired port for opening the web configurator.
Facial recognition settings
OMNI Agent uses detectors and recognition methods from 3DiVi Face SDK, a set of libraries for developing facial recognition solutions. Recognition includes the following operations of comparing biometric facial templates:- Verification 1:1 – comparing of two biometric templates (faces) between each other, estimating of coincidence;
- Identification 1:N – comparing of one biometric template (face) with other templates (faces), searching and estimating of coincidence.
When comparing face templates, Matcher calculates the difference between biometric features of faces. The calculations result in a measure of correspondence between face images and the probability of belonging to one person.
Setting through configuration file
You can configure all parameters specified in this section by editing config/run_params.json.
Score: The probability of correct recognition. Score value is float in a range [0..1]. To use score, follow the steps below:
Stop OMNI Agent (close the terminal window with the agent).
Add an entry desired_score (float) to the configuration file. Recommended parameter value is 0.876.
Run OMNI Agent.
When the score is specified, faR and frR are not taken into account in recognition.
faR: False acceptance rate (FAR) shows the system resistance to false acceptance errors. Such an error occurs when the biometric system recognizes a new face as previously detected one. This rate is measured by the number of false-acceptance recognitions divided by the total number of recognition attempts. You can change the faR value at
desired_far (float)parameter. By default, the faR value equals to 1e-5.frR: False rejection rate (FRR). When a system fails to recognize previously detected face, false rejection occurs. The rate shows the percentage of recognition attempts with false rejection result. You can change the frR value at
desired_frr (float)parameter. By default, the frR value equals to 0.
Setting via dashboard
To configure the score parameter via the dashboard, go to Settings and change the value in the Desired score field.
Make sure the score values specified for OMNI Agent and OMNI Platform match. Otherwise, some of the activities generated from the transferred agent processes will not be linked to the corresponding profile, which means that notifications for such activities won't be received.
For example:
- score specified for OMNI Agent = 0.7
- score specified for OMNI Platform = 0.85
In this case, activities generated from Agent processes with a score value in the range [0.7, 0.85) will not be attached to the corresponding profile, and notifications for them will also not appear.
Body detection and comparison settings
Setting through configuration file
To exclude low-confidence matches, you can change confidence thresholds for body detection and comparison.
Body detection confidence threshold is given in
detector_confidence (float)parameter and equals to 0.9 by default with a range of values from 0 to 1.Body comparison confidence threshold is given in
cos_reident_confidence (float)parameter and equals to 0.6 by default with a range of values from -1 to 1.
Logging
You can view the logs in the logfile_*.log file in the log folder. To change the logging level, go to the log_params.json configuration file and set a value for the sev_level(string) parameter. Available logging levels: TRACE, DEBUG, INFO, WARNING, ERROR, FATAL (listed in ascending order of importance).
Multi camera
Connecting the additional video stream (camera)
OMNI Agent supports connection to multiple video streams (cameras).- To connect an additional video stream via the OMNI Agent dashboard, click Add a camera on the cameras page and specify the IP/USB camera.
- To add an additional video stream to OMNI Agent by editing the configuration file, follow the steps below:
- In the config/run_params.json configuration file, create a new camera object in the
web_camsarray. To do this, simply copy the already existing camera object from theweb_camsarray. - Specify the IP address or ID of the new connected camera in the stream parameter of the new camera object. For USB cameras, you additionally need to specify the frame size: width and height.
- Run and activate the OMNI Agent.
- In the config/run_params.json configuration file, create a new camera object in the
As a result, the OMNI Agent will transfer data to OMNI Platform from two video streams (cameras).
To connect and operate additional video streams, you will need a machine with the following design characteristics:
- CPU: number of cores = 1 core + 3 x number of video streams @3GHz with AVX support. When one of the modules (face/body) is disabled, 1 CPU core is removed. In this case, the number of cores = 1 + 2 x number of video streams.
- RAM: 1GB + 1 GB x number of video streams. The amount of free RAM required is specified. If one of the modules (face/body) is disabled, the thread multiplier is expected to decrease by 25%. In this case, the amount of RAM = 1GB + 0.75GB x number of video streams.
- HDD: 3GB free space.
Traces
To analyze the processing results and identify arisen problems, it is possible to save a highly detailed processing log. We call this log a trace.
To enable/disable trace collection, open the log_params.json configuration file, find the traces object, set the values for enable (trace enabling, true/false) and trace_interval_in_msec (trace collection interval, integer).
When trace recording is enabled, OMNI Agent will write to the console a message like
"Starting to write the trace...", "Trace written: " <UUID>
After the last message, a new file is written with a name equal to the written UUID.
Received traces are saved in the subdirectory available at the address:
- Linux: ~/.local/share/OMNIAgent/Traces
- Windows: %LocalAppData%/OMNI Agent/Traces
The corresponding files conform to the BSON format when reading from the second byte.
Video files
To run OMNI Agent for processing video files, follow the steps below:
1. Connect OMNI Agent to OMNI Platform (launch the Agent, enter the server URL, and the email and password of your OMNI Platform account).
2. At Add a Camera page enter 123 in the URL field of IP camera.
3. Close OMNI Agent by closing the terminal.
4. Open config/run_params.json configuration file:
- Windows: %LocalAppData%\OMNIAgent\config\run_params.json
- Linux: ~/.local/share/OMNIAgent/config/run_params.json
5. Enable "lock_cam_on_module_creation" field.
"lock_cam_on_module_creation": true,
6. In the "web_cams" section, in the "stream" field, specify the path to the video file.
7. Add the fields below:
- "is_benchmark_camera": true
- "is_nonlocking_camera": true
8. Specify values for "title" and "real_name" fields (optional).
An example of the filled -in “web_cams” section for running OMNI Agent to process a video file:
"web_cams": [
        {
            "color_camera": {
                "creationDate": "2023-12-12T08:32:30.879147+00:00",
                "frame_crop": {
                    "height": 1,
                    "width": 1,
                    "x": 0,
                    "y": 0
                },
                "id": "c59fe4cb-5e9a-4bcb-a34b-e88879d1d692",
                "lastModified": "2023-12-12T08:32:30.879109+00:00",
                "real_name": "",
                "stream": "/home/stranger/Downloads/test_video_office.mp4",
                "title": "test_vid",
                "type": "IP",
                "is_benchmark_camera": true,
                "is_nonlocking_camera": true
            }
        }
    ]
9. Run OMNI Agent.
OMNI Agent will stop after video file processing is completed. Processing results in the format of processes and/or events will be transferred to OMNI Platform or third-party service via webhooks.For stable operation of OMNI Agent, it is not recommended to process multiple video files at the same time.
GPU
Software requirements:
Windows:
- CUDA Toolkit 11.8
- cuDNN v8.8.0 for CUDA 11.x
Linux:
- CUDA Toolkit 11.8
- cuDNN v8.8.0 for CUDA 11.x
Hardware requirements:
- CUDA compatible GPU (NVIDIA GTX 1050 Ti or better up to and including RTX 4090 (Compute capability 3.5-9.0))
Using CUDA for acceleration
To boost the performance of OMNI Agent using GPU, open the configuration file config/run_params.json and enable the use of CUDA:
Enable CUDA for the detector:
pipelines.face.video_worker_override_parameters.use_cuda: bool –true(enabled),false(disabled)
Enable CUDA 10 support for the detector (use_cuda must be true):
pipelines.face.video_worker_override_parameters.use_legacy: bool –true(enabled),false(disabled)
Enable CUDA for the recognizer:
pipelines.face.recognizer_override_parameters.use_cuda: bool –true(enabled),false(disabled)
Enable CUDA 10 support for the recognizer (use_cuda must be true):
pipelines.face.recognizer_override_parameters.use_legacy: bool –true(enabled),false(disabled)
Data retransmission
When the connection is failed, the data sent by Agent is saved in a special storage. When the connection is restored, this data is resent to the server.
Open the configuration file TDV/tdv_connection_params.json and provide values for the following variables:
resend_on_success_count: int – number of packets to resend. Default value is 15data_keeper_max_bytes: int64 – the maximum number of bytes in the storage. Default value is 68719476736 (64GB)
Сropping of original frames
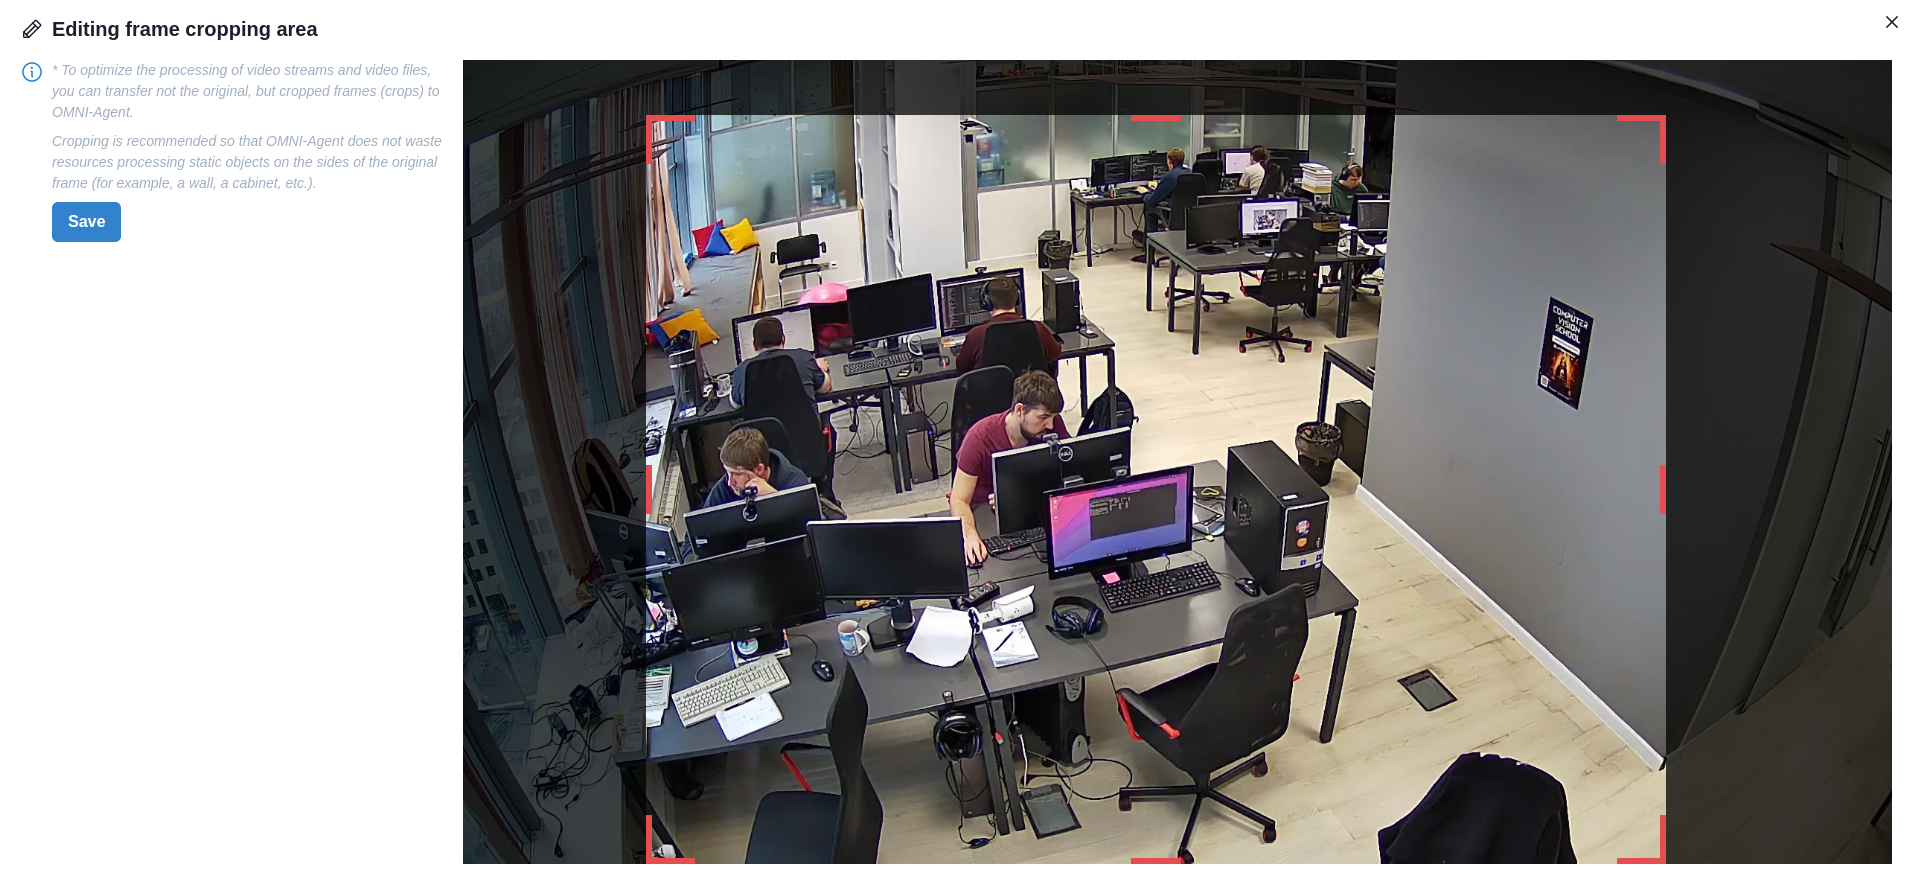
To optimize the processing of video streams and video files, you can transfer not the original, but cropped frames (crops) to OMNI Agent. Crop parameters (coordinates of the upper left corner, width and height of the crop) are indicated in normalized coordinates.
Cropping is recommended so that OMNI Agent does not waste resources processing static objects on the sides of the original frame (for example, a wall, a cabinet, etc.).
Setting through configuration file
To configure cropping, open the configuration file run_params.json and add a new object to the web_cams field:
frame_crop:x: float – X coordinate of the upper left corner in normalized coordinates of the original framey: float – Y coordinate of the upper left corner in normalized coordinates of the original framewidth: float – Crop width in normalized coordinatesheight: float – Crop height in normalized coordinates
For example, the web_cams field with the image crop fields filled in will look like this:
{
        "web_cams": [
        {
            "color_camera": {
                "creationDate": "2023-10-12T09:41:42.789486+00:00",
                "id": "7da98714-ae35-4832-834b-83cf82e4fe7a",
                "lastModified": "2023-10-12T09:47:38.190009+00:00",
                "real_name": "",
                "stream": "rtsp://guest:q2w3e4r5t@192.168.122.154/stream",
                "title": "rtsp://192.168.122.97:554",
                "type": "IP"
                "frame_crop": {
                    "x": 0.2,
                    "y": 0.3,
                    "width": 0.3,
                    "height": 0.25
                }
            }
        }
    ]
}
Setting via dashboard
To crop the original frame via the dashboard, click on the Gear sign in the upper right corner of the camera card. On the opened tab click on the Edit icon in the Frame cropping area section.
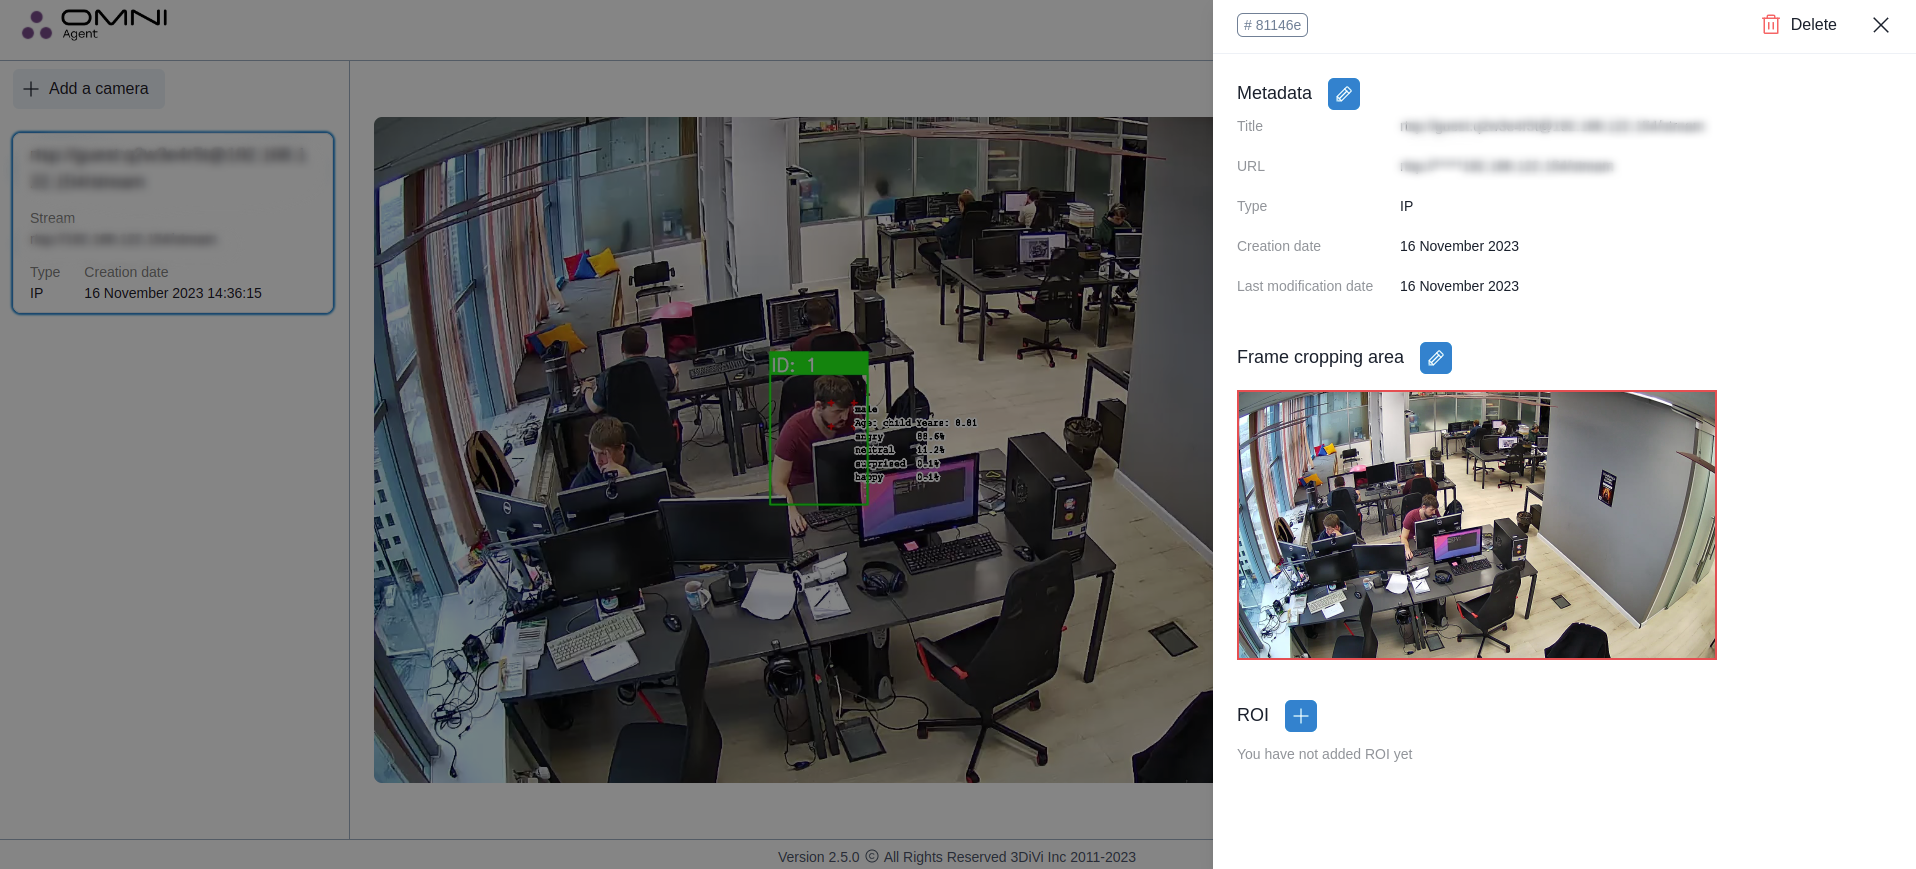
This will take you to a page where you can resize the original camera preview by dragging the red edges of the image. After editing, click Save.
As a result, a preview of the new sizes will be displayed in the dashboard.
Biometric template generation
By default, the generation of biometric templates allocates 1 core (1 thread) of the processor per 1 camera, which may be insufficient when running OMNI Agent in a multi-threaded (multi-camera) mode. To increase the number of template generation threads, open the configuration file config/run_params.json and change the value of the processing scale factor:
pipelines.face.processing_scale_factor: float – default value is1.5