Installation
Preparation
Windows
- Before installing OMNI Agent on Windows you might need to install Microsoft Visual C++ Redistributable for Visual Studio.
- Make sure the Windows username contains only ASCII characters.
Linux
- Set up the execution permission for the installer before running:
- Go to the directory, where OMNI Agent installer is downloaded to, and click the right button on the installation file.
- Open Properties, go to the Permission tab, and check Allow execute checkbox.
- Install libusb-0.1.so.4 (for Standalone mode only). To do this, run the command:
apt install libusb-0.1-4
ARMv8
apt-get update && apt-get install -y libqt5gui5 libqt5qml5 libqt5xml5 libqt5widgets5
Installation
Installation with GUI
- Download OMNI Agent installer from the distribution kit.
- Once the downloading is completed, run the OMNI Agent installer and follow the installation wizard's instructions.
Installation without GUI (only for Linux/Windows)
Install the following GUI libraries: libxrender1, libx11-xcb-dev, libxkbcommon-x11-0, libfontconfig1, fontconfig, libfontconfig1-dev.
Download the OMNI Agent installer from the distribution kit.
Run the installer.
path to the installer install
If you receive any warnings/errors that mention the Desktop folder, ignore them (type Ignore).
For additional information, pass the --help flag.
Activation
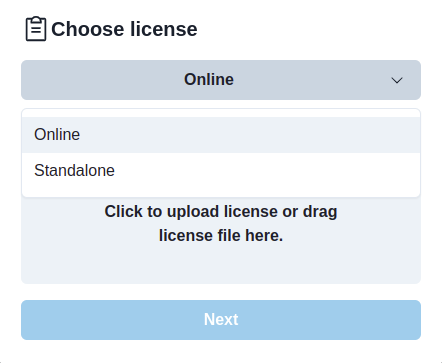
OMNI Agent (Standalone)
Run OMNI Agent.
Select a Standalone license and upload/drag a license file.
Click Save. This will take you to the main page of OMNI Agent dashboard.
OMNI Agent (Online)
- Run OMNI Agent.
- On the opened web page, select "Self-hosted", put the server domain and click on Next button. The domain is specified in the platform.values.yaml of OMNI Platform distribution kit in the field
ingress.rules.gateway.host. - Sign in to OMNI Agent using the email and password of your OMNI Platform account. This data is specified in ./cfg/platform.secrets.json in variables
platform-user-secret.default_passwordandplatform-user-secret.default_email. - This will take you to the main page of OMNI Agent dashboard.
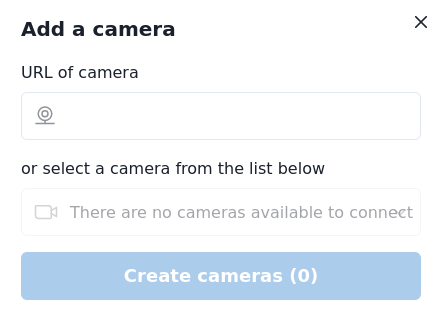
Adding a Camera
- To use an IP camera, enter the camera URL.
- To use a USB camera, connect the camera to your machine and select it from the list of connected cameras.
When choosing a camera, try to consider the following:
- The main flow of people should go directly to the camera, and not perpendicular to it.
- The light source should be behind the camera, so that faces are not shadowed in bright light.
Select RTSP transport type
Some IP cameras are unable to report the type of transport used for data streaming. In this case OMNI Agent can be unable to open given RTSP stream.
To manually set a fixed transport type, specify its name as a form-urlencoded parameter (without a value). For now OMNI Agent supports the following types of transport:
udptcphttpudp_multicast
Example 1: rtsp://localcamera.local.net:554/rtsp?udp
Example 2: rtsp://localcamera.local.net:554/rtsp?hres=720&wres=1280&udp_multicast
Camera Preview
After a camera is successfully added, OMNI Agent dashboard will display preview from the camera, detections (bboxes) of faces and silhouettes and additional information about people in the camera's field of view: their gender, age, emotions, etc.
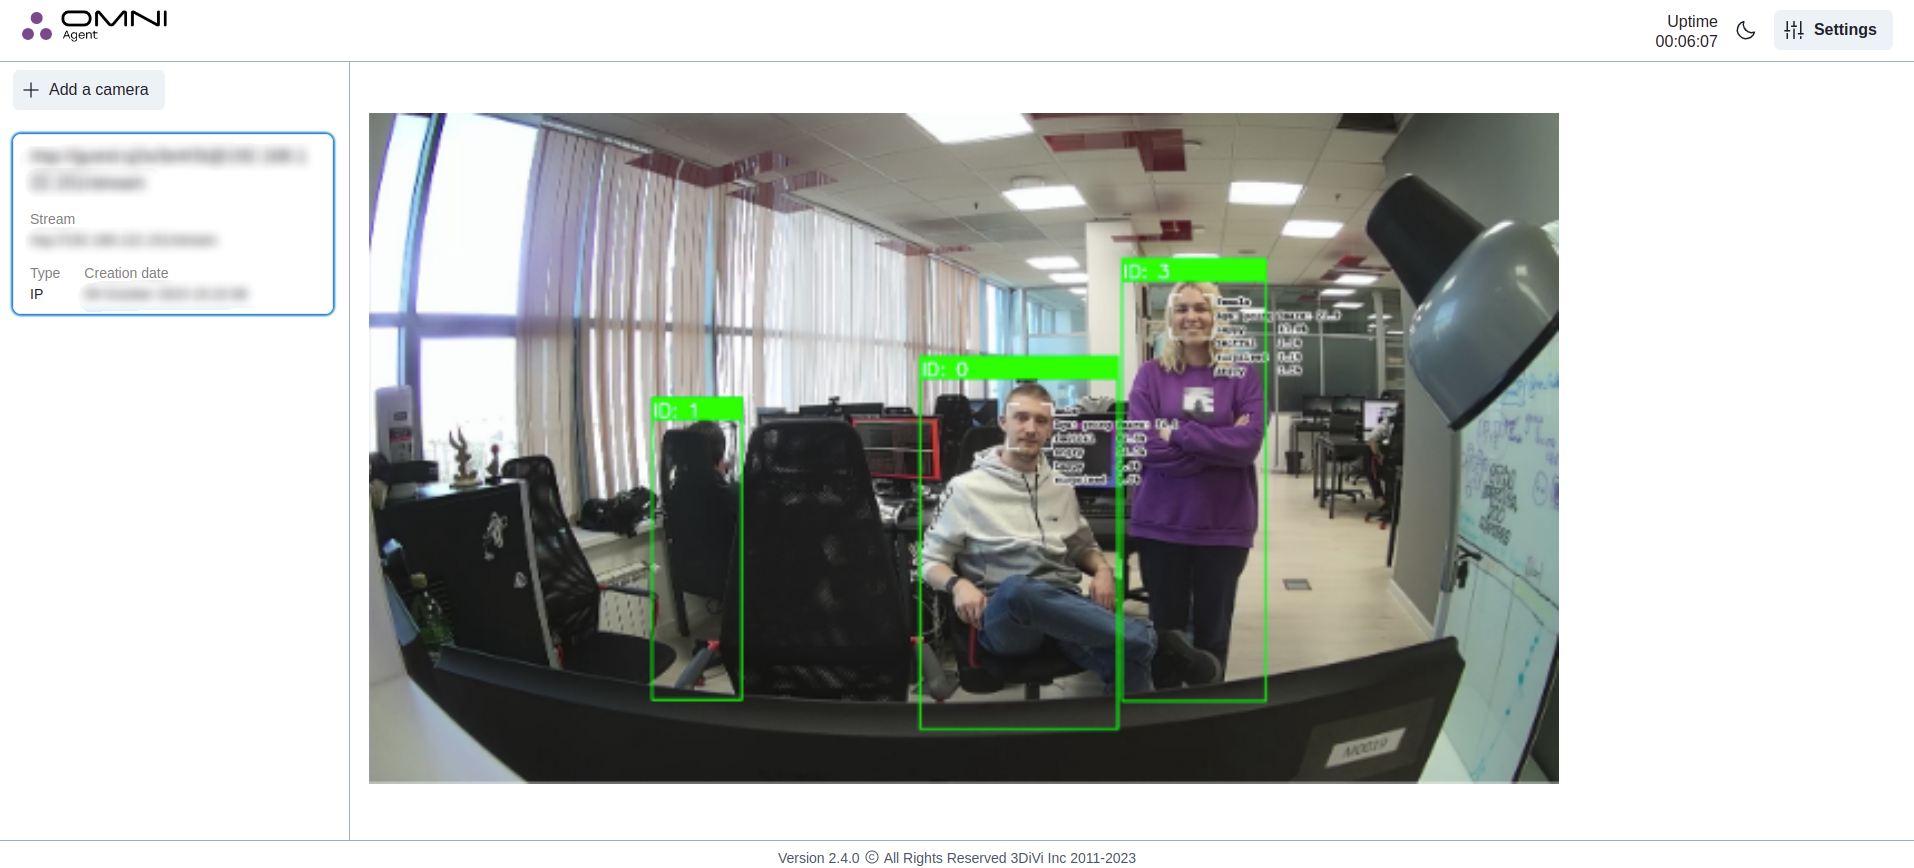
The detected faces and silhouettes are highlighted as follows:
face bbox:
- bbox with red corners: a face is detected but the person’s attention is none.
- bbox with white corners: both a face and the person’s attention are detected.
- bbox with corners of + form: image quality is insufficient or head rotation angle is not applicable for proper detection.
- bbox with green corners: a face is detected and recognized but the person attention is not registered.
- bbox with orange corners: a face is detected and recognized, and the person's attention is registered.
body bbox:
- green bounding box: a human silhouette is detected and has an ID.
- red bounding box: a human silhouette is detected, but an ID is not assigned yet.
Configure OMNI Agent as a Linux/Windows service
After installation, you can configure OMNI Agent to operate as the OS service. This will ensure that OMNI Agent starts up automatically when the OS starts, and runs in the background.
Linux
Close the terminal with OMNI Agent.
Enable autorun of OMNI Agent when the OS starts.
systemctl enable OMNIAgentStart OMNI Agent in service mode.
systemctl start OMNIAgentCheck OMNI Agent status.
systemctl status OMNIAgent
Windows
Close the terminal with OMNI Agent.
Open Windows Task Manager -> Services -> OMNIAgent.
Right-click on the OMNIAgent service, select Properties -> General -> Startup Type -> Automatic.
Click Apply.