Installation
Preparation
Windows
- Before installing OMNI Agent on Windows you might need to install Microsoft Visual C++ Redistributable for Visual Studio.
- Make sure your Windows username contains only ASCII characters (Latin letters, digits, and punctuation marks).
Linux
- Set up the execution permission for the installer before running:
- Go to the directory, where OMNI Agent installer is downloaded to, and click the right button on the installation file.
- Open Properties, go to the Permission tab, and check Allow execute checkbox.
Installation
Installation with GUI
Download OMNI Agent installer from the distribution kit.
Once the downloading is completed, run the OMNI Agent installer and follow the installation wizard's instructions.
Installation without GUI (only for Linux/Windows x86_64)
Install the following GUI libraries:
sudo apt update && sudo apt install libxrender1 libx11-xcb-dev libxkbcommon-x11-0 libfontconfig1 fontconfig libfontconfig1-dev
Download the OMNI Agent installer from the distribution kit.
Run the installer.
Windows:
InstallOMNIAgent.exe installThe command is launched from the console as administrator.
Linux:
sudo -E ./InstallOMNIAgent installIf you receive any warnings / errors that mention the Desktop folder, ignore them (type
Ignore).For additional information, pass the
--helpflag.
Activation
Run OMNI Agent.
In the “Server Selection” window, specify the server domain and click
Next. For local deployment, the domain is specified in theingress.rules.gateway.hostfield of the platform.values.yaml file from OMNI Platform distribution — the data collection server for OMNI Agent. To work with OMNI Agent in the cloud, specify the domainhttps://cloud.3divi.ai/.
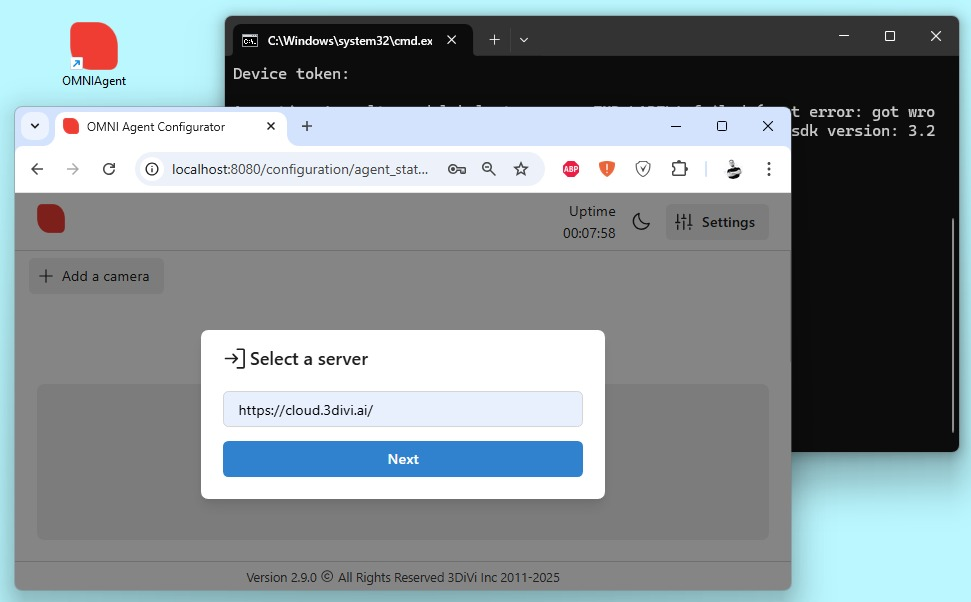
Log in to OMNI Agent. The login credentials (email and password) are specified in OMNI Platform configuration file ./cfg/platform.secrets.json under the variables
platform-user-secret.default_emailandplatform-user-secret.default_password.
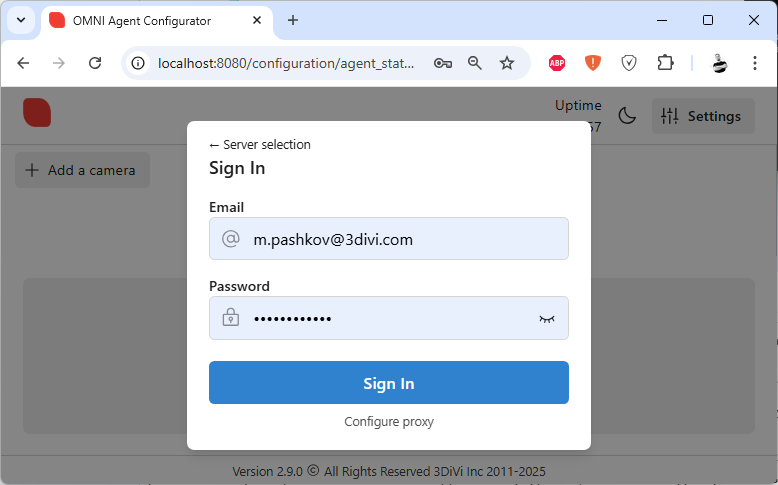
This will take you to the main page of OMNI Agent web interface.
Do not open multiple OMNI Agent tabs in the same browser simultaneously. This may cause a conflict, preventing OMNI Agent from correctly determining which tab to receive input data from.
Adding a camera / Uploading a video file
After activation, click +Add in the upper-left corner of the page:
IP Camera: Select RTSP, then enter the camera name and URL in the opened window.
USB Camera: Connect the camera to your device, select USB, enter the camera name, and choose it from the list.
Video File: Select a file and specify the full path to the file.
To prevent looping video playback in OMNI Agent (so events are not generated continuously), check Stop OMNI Agent at the end of the video.
You can also specify the actual start date of the recording. This is important so that video events are recorded in the database with the exact date they occurred.

Selecting video analytics scenarios and integrations
After adding a camera or uploading a video file, a preview of the camera or video will appear in the web interface. On the left, a menu will show available video analytics scenarios and integrations.
Video analytics scenarios
Video analytics scenario is a ready-made configuration that can be quickly applied to a camera or video file. Each scenario already includes everything needed for typical computer vision tasks:
Objects to detect in the frame (e.g., faces, bodies, mobile phones, etc.)
Actions to perform with these objects (tracking, identification, behavioral analysis)
Computer vision models and algorithms responsible for executing these tasks

Click + Add a scenario and choose the appropriate preconfigured scenarios from the table below:
| Category | Title | Description |
|---|---|---|
| Faces | Identification, intruder detection | Searches faces in the database, including detection of unknown individuals not registered in the system. |
| Faces | Hide control | Detects cases where a person turns away or hides their face with a scarf, hat, glasses, mask, etc. |
| Faces | Age, gender, attention, emotions | Detects and tracks faces, recognizing attributes such as gender, age, and emotions. |
| Objects | Phones | Detects and tracks mobile phones in the frame. |
| Objects | Universal detector | Detects and tracks arbitrary objects using templates trained with few-shot learning technology. |
| Bodies | Perimeter and work zone monitoring (Top view) | Detects and tracks human bodies and skeletal key points within regions of interest. |
| Bodies | Perimeter and work zone monitoring (Overview view) | Detects and tracks human bodies and skeletal key points within regions of interest. |
| Bodies | Behavioral analytics (Top view) | Detects and tracks actions such as sitting and lying down. |
| Bodies | Behavioral analytics (Overview view) | Detects and tracks actions such as falling, fighting, sitting, and lying down. |
After selecting a scenario, it will appear in the upper-left part of the screen. You can then adjust its settings or remove it from the list of added scenarios if needed.

Integrations
Next, specify how to transfer data from OMNI Agent — three options are available:
To OMNI Platform Agent via HTTP
To an external service via webhook
Via the MQTT protocol
Once all settings are configured, click Save at the bottom of the page.
Camera preview / video playback
After adding a camera or video file in the web interface, a preview of the camera feed or video file should be displayed with detections of faces, bodies and skeleton joints, along with information about individuals in the camera's field of view, such as gender, age, emotions, etc. Detected faces and bodies are highlighted in the preview with bounding boxes (bbox), while skeleton joints are represented with solid or dashed lines.

Variations of bounding boxes (bbox) for detected faces
| Bbox indications | Description | Preview |
| Red corners | A face is detected, a person is not looking at the camera. | ![]() |
| Double red corners | A face is detected, a person is looking at the camera. | ![]() |
| Red corners in the shape of "+" | Poor image quality or an unsuitable head angle for accurate detection. | ![]() |
| Double red corners in the shape of "+" | Poor image quality or an unsuitable head angle for accurate detection, but a person is looking at the camera. | ![]() |
| Green corners | A face is identified, a person is not looking at the camera. | ![]() |
| Double green corners | A face is identified, a person is looking at the camera. | ![]() |
| Green corners in the shape of "+" | A face is identified, but with poor image quality or an unsuitable head angle for accurate detection. | ![]() |
| Dashed red-blue corners | A face is detected, a person is within the ROI and not looking at the camera. | ![]() |
| Double dashed red-blue corners | A face is detected, a person is within the ROI and looking at the camera. | ![]() |
| Red-blue corners in the shape of "+" | Poor image quality or an unsuitable head angle for accurate detection, but the person is within the ROI. | ![]() |
| Double red-blue corners in the shape of "+" | Poor image quality or an unsuitable head angle for accurate detection. A person is within the ROI, looking at the camera. | ![]() |
| Dashed yellow-green corners | A face is identified, a person is within the ROI, not looking at the camera. | ![]() |
| Double dashed yellow-green corners | A face is identified, a person is within the ROI, looking at the camera. | ![]() |
| Yellow-green corners in the shape of "+" | A face is identified, a person is within the ROI, but the image quality is poor or a head angle is unsuitable for accurate detection. | ![]() |
Variations of bounding boxes (bbox) for detected bodies
| Bbox indications | Description | Preview |
| Green bbox | The neural detector detects a body, assigns it a unique identifier, and compares it with previously tracked bodies to determine if the person has appeared before. If the person has been in the frame before, the track is continued. If not, a new track is created for the new body with a unique identifier. | ![]() |
| Blue bbox with highlighting in the ROI (Region of Interest) | The neural detector detects a body and tracks its position within the ROI. However, the event of entering the ROI is only triggered after the time specified in the run.params.json parameters has passed. | ![]() |
Variations of detected skeleton joints
| Indications | Description | Preview |
| Solid purple line | Skeleton joints with a detection confidence above the threshold (0.5). | ![]() |
| Dashed purple line | Skeleton joints with a detection confidence below the threshold (0.5). | ![]() |
Configure OMNI Agent as a Linux / Windows service
After installation, you can configure OMNI Agent to operate as the OS service. This will ensure that OMNI Agent starts up automatically when the OS starts, and runs in the background.
Linux
Close the terminal with OMNI Agent.
Enable autorun of OMNI Agent when the OS starts.
sudo systemctl enable OMNIAgent.serviceStart OMNI Agent in service mode.
sudo systemctl start OMNIAgent.serviceCheck OMNI Agent status.
sudo systemctl status OMNIAgent.service
Windows
Close the terminal with OMNI Agent.
Open Windows Task Manager -> Services -> OMNIAgent.
Right-click on the OMNIAgent service, select Properties -> General -> Startup Type -> Automatic.
Click Apply.
Deletion
To delete OMNI Agent, execute the commands below:
Linux
sudo systemctl stop OMNIAgent.service
sudo systemctl status OMNIAgent.service
sudo systemctl disable OMNIAgent.service
sudo /opt/OMNIAgent/uninstall purge
Windows
Run the UninstallOMNIAgent shortcut from the desktop or execute the following command in the command prompt:
C:\Program Files\OMNIAgent\uninstall purge


