Scenario settings
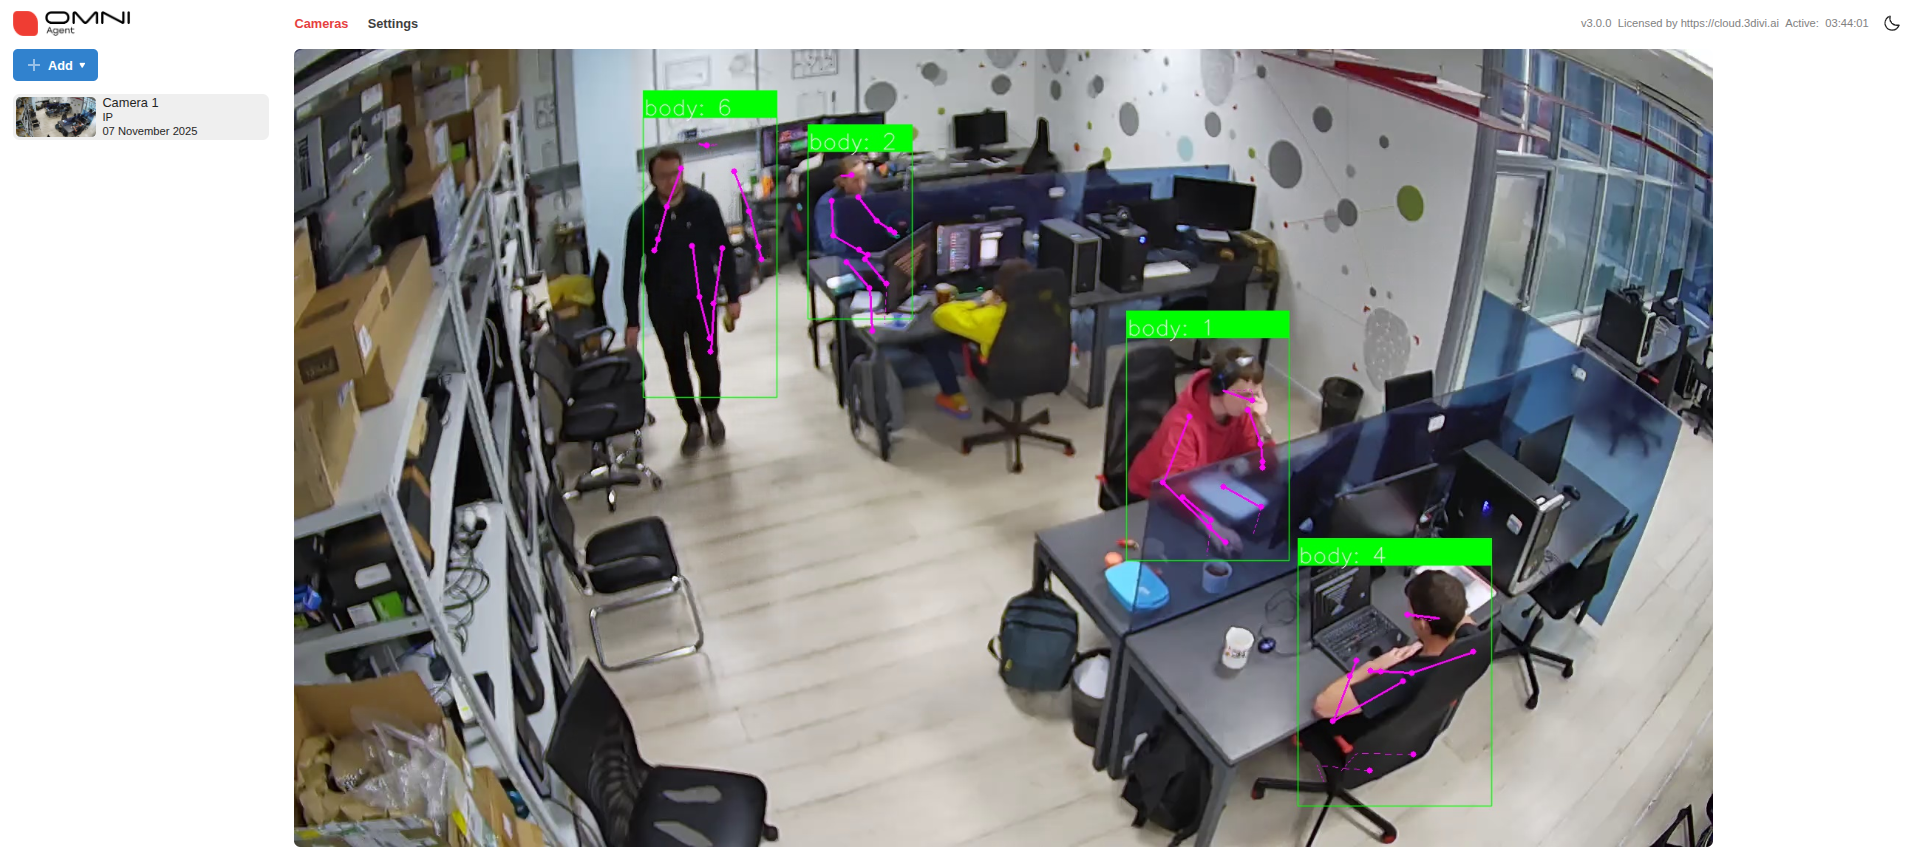
After adding a camera or uploading a video file, a preview of the camera or video will appear in the web interface. On the left, a menu will show available video analytics scenarios and integrations.
Video analytics scenarios
Video analytics scenario is a ready-made configuration that can be quickly applied to a camera or video file. Each scenario already includes everything needed for typical computer vision tasks:
Objects to detect in the frame (e.g., faces, bodies, mobile phones, etc.)
Actions to perform with these objects (tracking, identification, behavioral analysis)
Computer vision models and algorithms responsible for executing these tasks
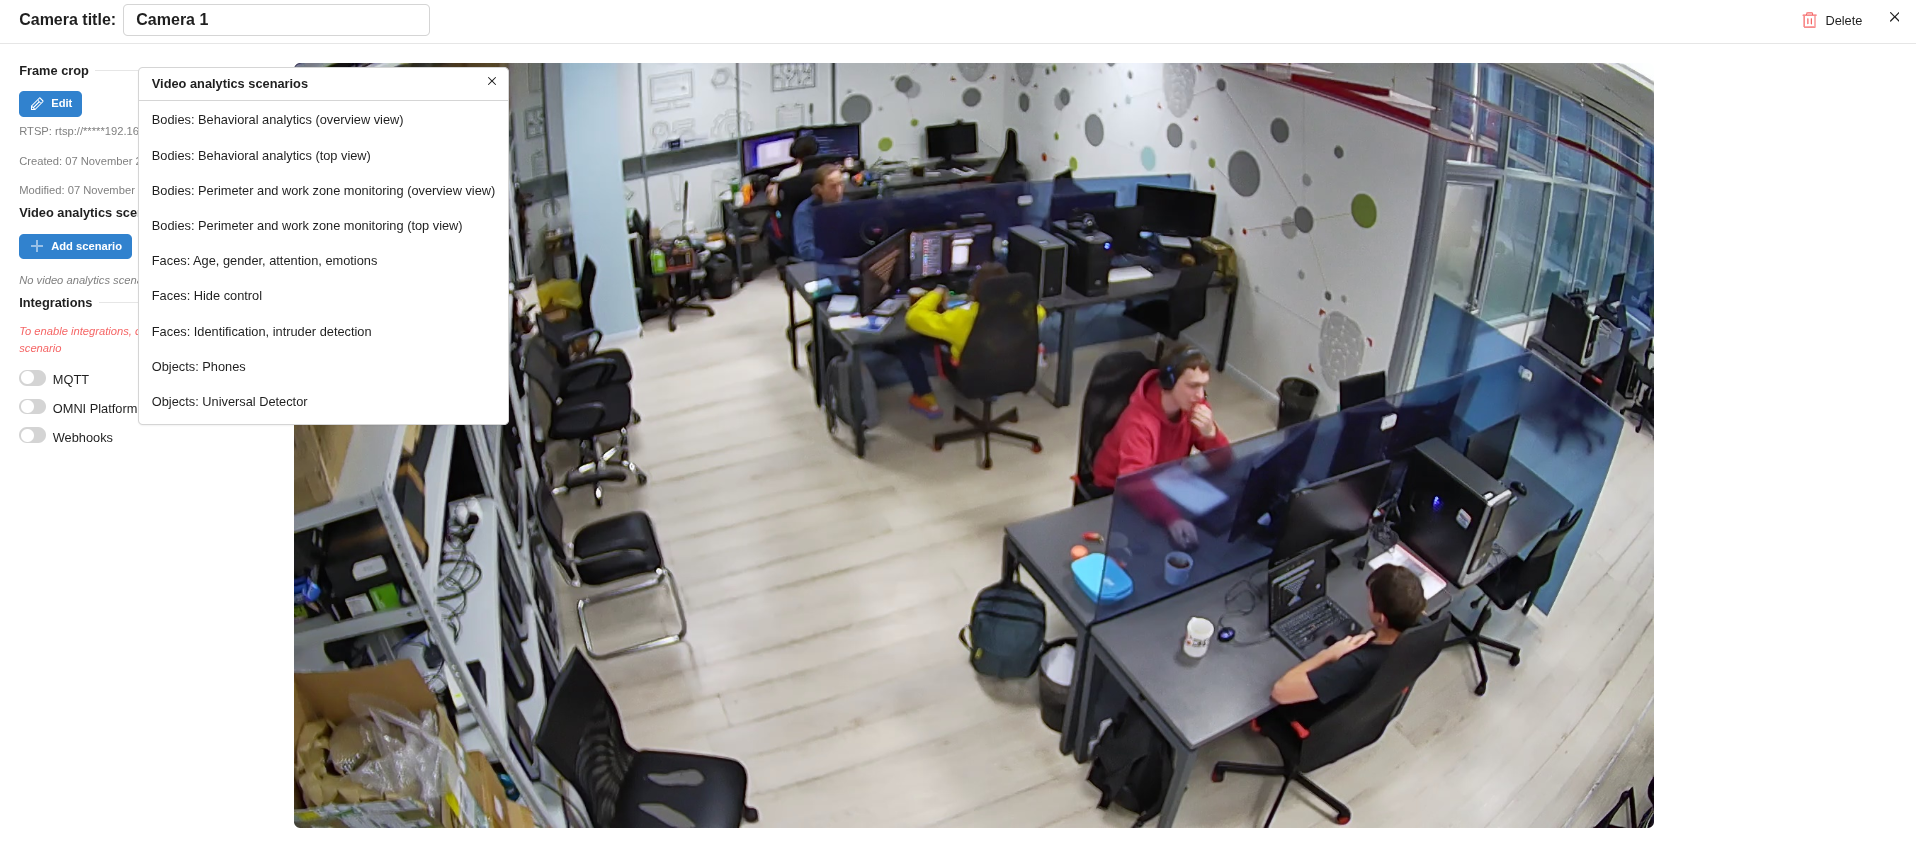
Click + Add a scenario and choose the appropriate preconfigured scenarios from the table below:
| Category | Title | Description |
|---|---|---|
| Faces | Identification, intruder detection | Searches faces in the database, including detection of unknown individuals not registered in the system. |
| Faces | Hide control | Detects cases where a person turns away or hides their face with a scarf, hat, glasses, mask, etc. |
| Faces | Age, gender, attention, emotions | Detects and tracks faces, recognizing attributes such as gender, age, and emotions. |
| Objects | Phones | Detects and tracks mobile phones in the frame. |
| Objects | Universal detector | Detects and tracks arbitrary objects using templates trained with few-shot learning technology. |
| Bodies | Perimeter and work zone monitoring (Top view) | Detects and tracks human bodies and skeletal key points within regions of interest. |
| Bodies | Perimeter and work zone monitoring (Overview view) | Detects and tracks human bodies and skeletal key points within regions of interest. |
| Bodies | Behavioral analytics (Top view) | Detects and tracks actions such as sitting and lying down. |
| Bodies | Behavioral analytics (Overview view) | Detects and tracks actions such as falling, fighting, sitting, and lying down. |
After selecting a scenario, it will appear in the upper-left part of the screen. You can then adjust its settings or remove it from the list of added scenarios if needed.
Integrations
Next, specify how to transfer data from OMNI Agent — three options are available:
To OMNI Platform Agent via HTTP
To an external service via webhook
Via the MQTT protocol
Once all settings are configured, click Save at the bottom of the page.
Video analytics scenario settings
To modify scenario parameters, click the ✏️ icon next to the scenario in the list.
Settings are grouped into four categories:
Processing Configuration — performance and accuracy parameters of the scenario
Output Data — data transfer settings and enabling anonymous mode
Regions of Interest (ROI) — adding ROIs and crossing lines
Events — configuring data transmission to OMNI Platform and external systems
Processing configuration
This group includes settings for performance and detection sensitivity. The available options depend on the selected scenario:
Hardware Acceleration: Enable GPU acceleration using CUDA or TensorRT for faster processing.
Detection and Tracking Confidence Thresholds: Set confidence levels for object actions. For example, perimeter control scenarios have separate thresholds for detection, tracking start, and tracking continuation.
Object Size Filtering: Specify minimum object sizes to include in analysis. For instance, in unauthorized face detection, you can set a minimum face size for optimal frame capture.
See the ready-made scenarios for detailed processing configurations.
Output data settings
A key option is Anonymous Mode: When enabled, object images (e.g., faces or bodies) are not transmitted outside OMNI Agent, ensuring compliance with data privacy requirements.
Regions of interest (ROI)
A Region of Interest (ROI) is an area marked over the video frame where object presence triggers events. OMNI Agent detects and tracks objects of specified classes in the ROI. Detection and tracking results are sent to OMNI Platform or an external service in the form of processes and events.
Multiple object classes can be tracked in the same ROI. ROIs are drawn by marking at least three points on the frame. The marked area is shown in white; when at least one object enters, it changes to turquoise.
Object presence in an ROI is determined by the coordinates of a single point derived from the object’s bounding box (bbox).
Adding ROIs
In the scenario settings, go to ROI/Line Settings and click
Add ROI.Enter the ROI name, select type Region, choose object classes to track, draw the area on the camera preview, and click Save.
The ROI will now appear on the camera preview.
Adding Crossing Lines
In addition to ROIs, you can add crossing lines over the frame. When an object fully crosses the line, OMNI Agent sends detection and tracking results to OMNI Platform or an external service.
Lines are light red by default and turn red when crossed by an object.
To add a line: Go to ROI/Line Settings, click Add ROI, select type Line, choose tracked classes, mark two points, set the abstract zone thickness, and click Save.
Event settings
An event represents the outcome of a scenario, reflecting actions such as detecting an unauthorized face, a body entering a controlled zone, or behavioral analytics.
Settings for events, common to all scenarios, include:
Enable Line Crossing Event Reporting
- Enable Line Crossing Event Reporting (Entry) / Enable Line Crossing Event Reporting (Exit).
- Repeat Event Skip Interval (ms): Default is 0. Repeat crossing events for a given line will not be sent within the specified interval.
- Minimum Relative Object Width: Default is 0. The minimum width of a tracked object relative to the full frame for line crossing events.
- Maximum Relative Object Width: Default is 1. The maximum width of a tracked object relative to the full frame for line crossing events.
- Minimum Relative Object Height: Default is 0. The minimum height of a tracked object relative to the full frame for line crossing events.
- Maximum Relative Object Height: Default is 1. The maximum height of a tracked object relative to the full frame for line crossing events.
Enable ROI Event Reporting
- Enable ROI Event Reporting (Entry) / Enable ROI Event Reporting (Exit).
- Entry Confirmation Time (ms): Default is 1500. Objects staying in the ROI for less than this duration will be ignored (ROI entry events will not be triggered).
- Repeat Event Skip Interval (ms): Default is 0. Repeat ROI events for a given area will not be sent within the specified interval.
- Minimum Relative Object Width: Default is 0. The minimum width of a tracked object relative to the full frame for ROI events.
- Maximum Relative Object Width: Default is 1. The maximum width of a tracked object relative to the full frame for ROI events.
- Minimum Relative Object Height: Default is 0. The minimum height of a tracked object relative to the full frame for ROI events.
- Maximum Relative Object Height: Default is 1. The maximum height of a tracked object relative to the full frame for ROI events.
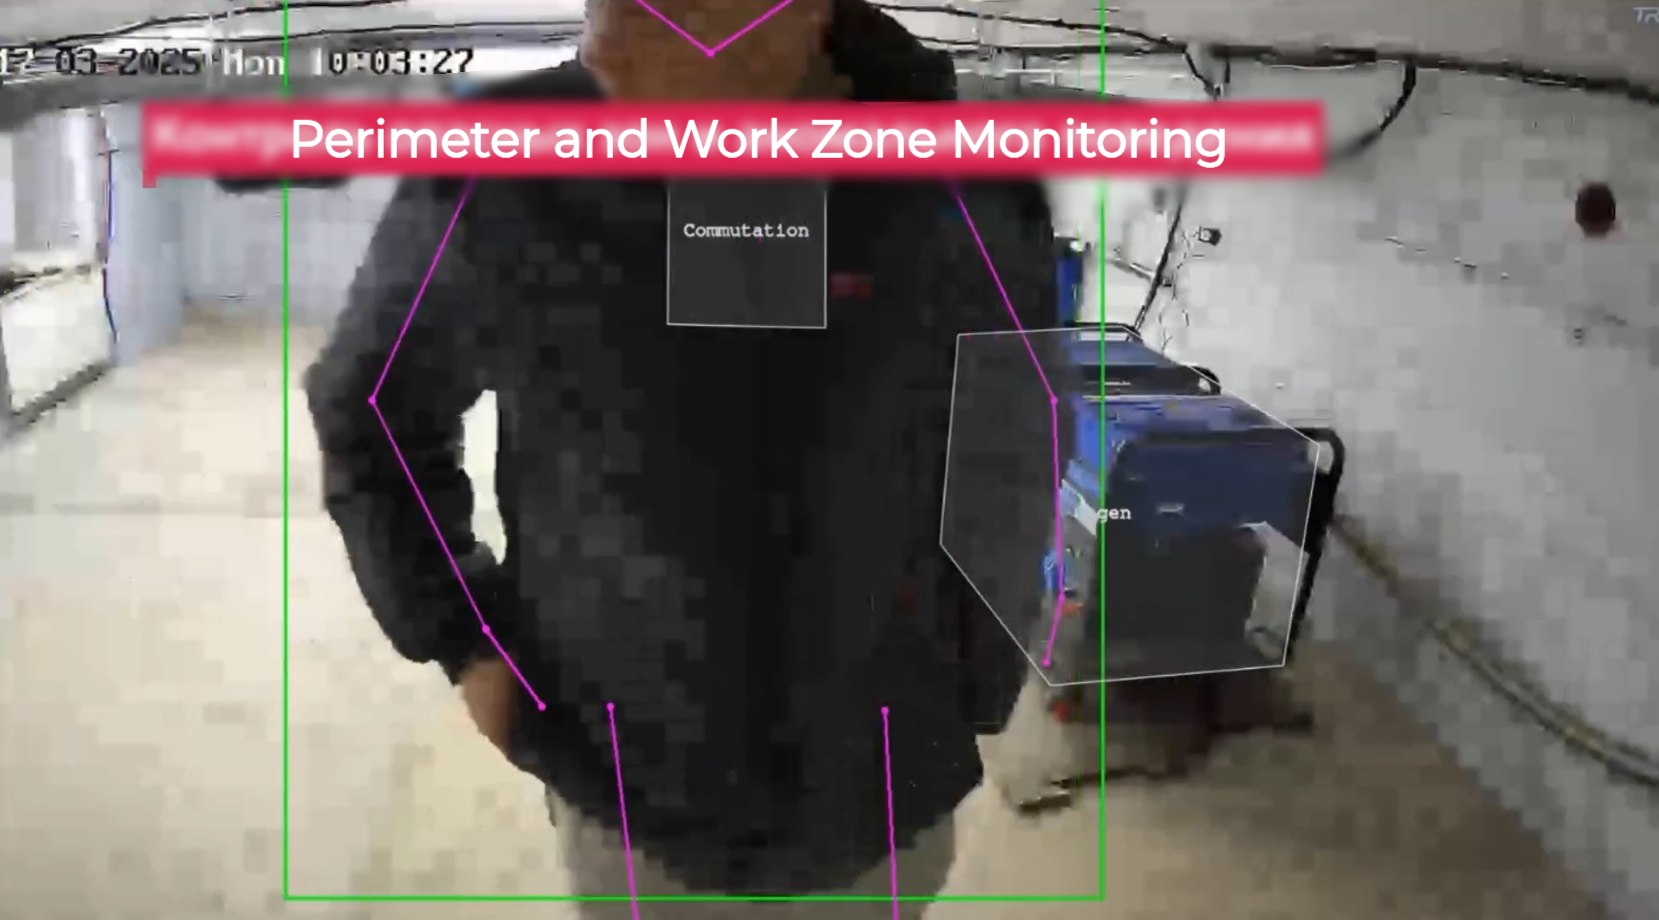
If an object in the region of interest (for example, a generator) is located in the background, a person passing in the foreground may visually overlap it with their hand. In the camera projection, this may appear as if the hand has entered the generator’s zone, even though the person is not actually interacting with it.
Because the person in the foreground is closer to the camera, their detection appears significantly larger than the detections of people standing near the generator in the background.
The maximum relative width and height settings allow the system to filter out such large detections and prevent events from being triggered based on them.