Developing apps for iOS
This guide is intended to explain how to integrate Face SDK into an XCode project. The created demo app shows such Face SDK features as initializing the libfacerec library and detecting facial landmarks in the picture.
You can find the tutorial project in Face SDK: examples/tutorials/ios_minimal_project
Note: Minimum supported iOS version is 11.4.
- Download and unpack the distribution package as described in Getting Started.
- Create a new XCode project: File > New > Project. Select the Single View App app type. Leave the default project settings. Choose the directory to store the project.
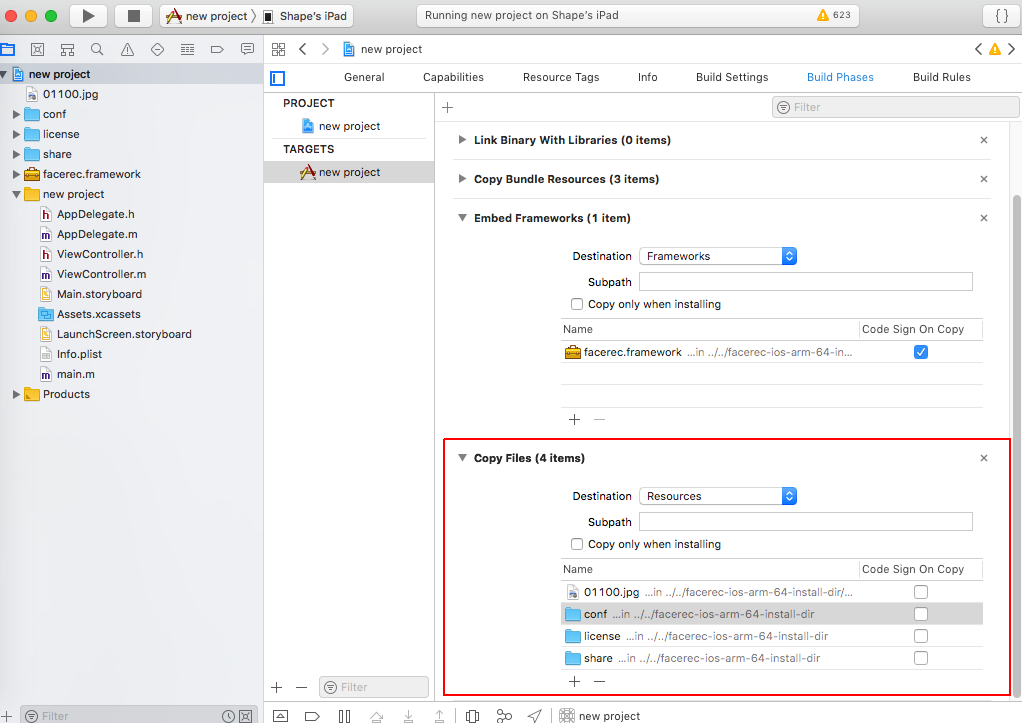
- Add the facerec framework to the app: in project settings, select General > Embedded Binaries > + > Add Other...> >, then select the facerec.framework directory from the unpacked distribution package. Tick Copy items if needed in the Destination group, if necessary. After that, click Finish.

- By default, the framework is automatically added to Linked Frameworks. Delete the framework from this list (linking at this stage is not required because the facerec library is loaded at runtime).
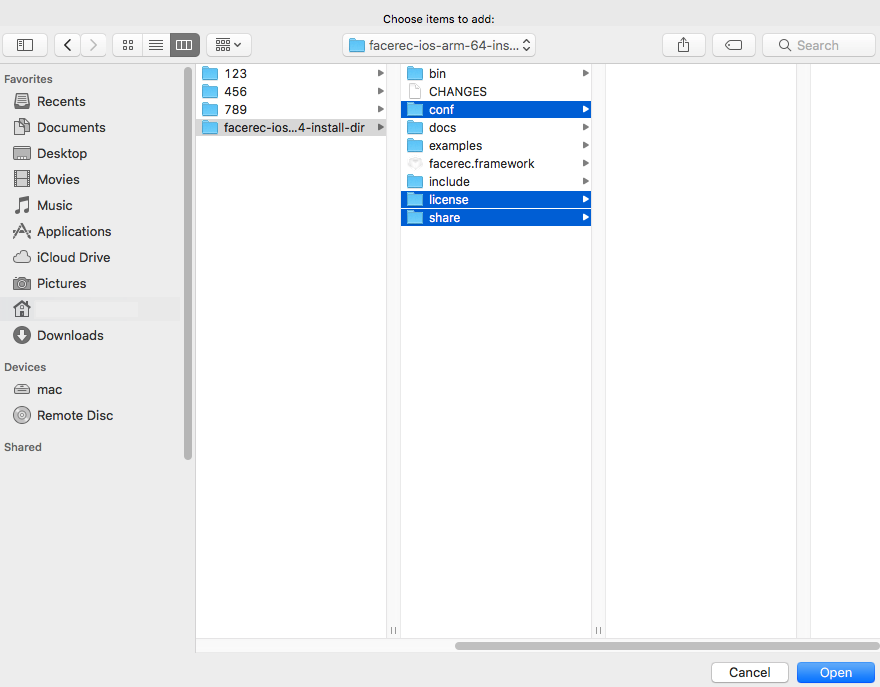
- Add the folders with necessary files (conf, license, share) to the project. In project settings, select Build Phases > + New Copy Files Phase > Copy Files > + > Add Other... > select the folders conf, license, share. Tick Copy items if needed in the Destination group, if necessary. After that, click Finish.
- Set the path to the headers from the distribution package. In project settings, select Build Settings > Search Paths > Header Search Paths >, double click left mouse button and drag-and-drop the include folder from the distribution package.
- Specify the supported architecture: Architectures > Valid Architectures > arm64.
- Edit the created project. Open
main.mand set the language: Identity and Type > Type > Objective-C++ Source. - Edit the code in
main.mas shown in the example below:
#import <UIKit/UIKit.h>
#import "AppDelegate.h"


#include "pbio/FacerecService.h"

#include <vector>
#include <fstream>
#include <iostream>


BOOL copyLicense(NSString *srcDir, NSString *dstDir)
{
    NSString *dstLicenseFile = [dstDir stringByAppendingPathComponent:@"3divi_face_sdk.lic"];
    NSFileManager* fileMgr = [NSFileManager defaultManager];
    if ([fileMgr fileExistsAtPath:dstLicenseFile])
    {
        NSLog(@"The license file already exists in the target directory");
        return YES;
    }

    NSError *error;
    // create destination directory
    if (![fileMgr createDirectoryAtPath:dstDir
        withIntermediateDirectories:YES
        attributes:nil
        error:&error])
    {
        NSLog(@"Create license directory error: %@", error);
        return NO;
    }

    // copy license and config files
    if (![fileMgr copyItemAtPath:[srcDir stringByAppendingPathComponent:@"3divi_face_sdk.lic"]
        toPath:dstLicenseFile
        error:&error])
    {
        NSLog(@"Copy file error: %@", error);
        return NO;
    }
    if (![fileMgr copyItemAtPath:[srcDir stringByAppendingPathComponent:@"net_params.xml"]
        toPath:[dstDir stringByAppendingPathComponent:@"net_params.xml"]
        error:&error])
    {
        NSLog(@"Copy file error: %@", error);
        return NO;
    }
    if (![fileMgr copyItemAtPath:[srcDir stringByAppendingPathComponent:@"log_params.xml"]
        toPath:[dstDir stringByAppendingPathComponent:@"log_params.xml"]
        error:&error])
    {
        NSLog(@"Copy file error: %@", error);
        return NO;
    }

    return YES;
};


int main(int argc, char * argv[]) {

    std::cout << "Start application" << std::endl;

    std::cout << "Copy license to writable directory" << std::endl;
    // FaceSDK requires write permission to the license directory
    // copy the license from the resource directory to the application support directory
    NSArray *paths = NSSearchPathForDirectoriesInDomains(NSApplicationSupportDirectory, NSUserDomainMask, YES);
    NSString *applicationSupportDirectory = [paths firstObject];
    NSString *dstLicenseDir = [applicationSupportDirectory  stringByAppendingPathComponent:@"license"];
    NSString *srcLicenseDir = [[[NSBundle mainBundle] resourcePath] stringByAppendingPathComponent:@"license"];
    if(!copyLicense(srcLicenseDir, dstLicenseDir))
    {
        std::cout << "Something went wrong while copying the license to a writable location" << std::endl;
        return -1;
    };

    const std::string frameworks_dir = [[[NSBundle mainBundle] privateFrameworksPath] UTF8String];
    const std::string resources_dir = [[[NSBundle mainBundle] resourcePath] UTF8String];

    std::cout << "Create FacerecService" << std::endl;
    const pbio::FacerecService::Ptr service = pbio::FacerecService::createService(
        frameworks_dir + "/facerec.framework/libfacerec.dylib",
        resources_dir + "/conf/facerec",
        [dstLicenseDir UTF8String]);

    std::cout << "Get license state" << std::endl;
    const pbio::FacerecService::LicenseState ls = service->getLicenseState();
    std::cout << "ls.online         : "  << ls.online         << std::endl;
    std::cout << "ls.android_app_id : "  << ls.android_app_id << std::endl;
    std::cout << "ls.ios_app_id     : "  << ls.ios_app_id     << std::endl;
    std::cout << "ls.hardware_reg   : "  << ls.hardware_reg   << std::endl;

    std::cout << "Create Capturer" << std::endl;
    const pbio::Capturer::Ptr capturer = service->createCapturer("fda_fake_detector_singleface.xml");

    std::cout << "Read image" << std::endl;
    std::vector<char> bytes;
    std::ifstream file((resources_dir + "/01100.jpg").c_str(), std::ios_base::binary);
    file.seekg(0, file.end);
    bytes.resize(file.tellg());
    file.seekg(0, file.beg);
    file.read(bytes.data(), bytes.size());
    file.close();


    std::cout << "Detect faces" << std::endl;
    const std::vector<pbio::RawSample::Ptr> samples = capturer->capture((const unsigned char*)bytes.data(), bytes.size());

    std::cout << samples.size() << " faces detected" << std::endl;

    for(const pbio::RawSample::Ptr &sample : samples)
    {
        const std::vector<pbio::Point> pts = sample->getLandmarks();
        for(const pbio::Point &p : pts)
            std::cout << "(" << p.x << ", " << p.y << "), ";
        std::cout << std::endl;
    }

    std::cout << "Done" << std::endl;

    @autoreleasepool {
        return UIApplicationMain(argc, argv, nil, NSStringFromClass([AppDelegate class]));
    }
}
- Check the demo using a face picture. You can use our example (the path to the picture is
bin/set1/01100.jpg) or upload your picture. Add the picture to the project: Copy Files > + > Add Other... > and set the path to the picture. Specify the path in the code (see theresources_dir + ...line).
- Connect your iOS device to your computer and build the app (click Run). If an error occurs (see the image below), verify the developer certificate on your iOS device.

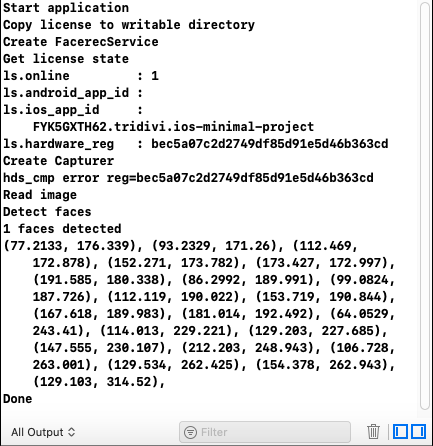
- The output should be as follows: